
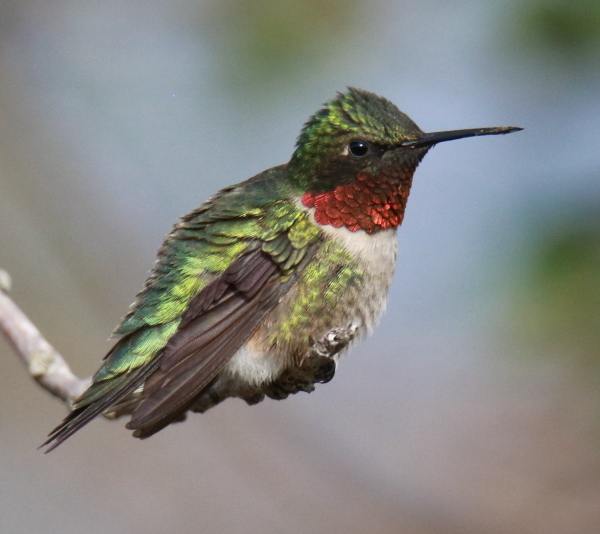
Hummingbirds often return to a favorite perch, where they can be photographed as they rest in between foraging flights. With the sun behind you and your shadow pointing at the bird, the iridescent colors of the hummingbird’s plumage will literally glow.
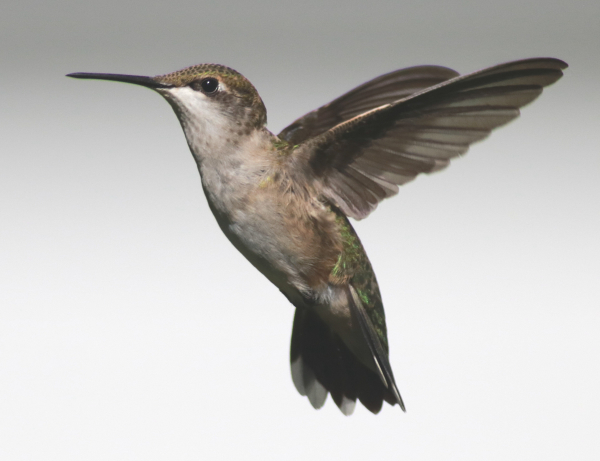
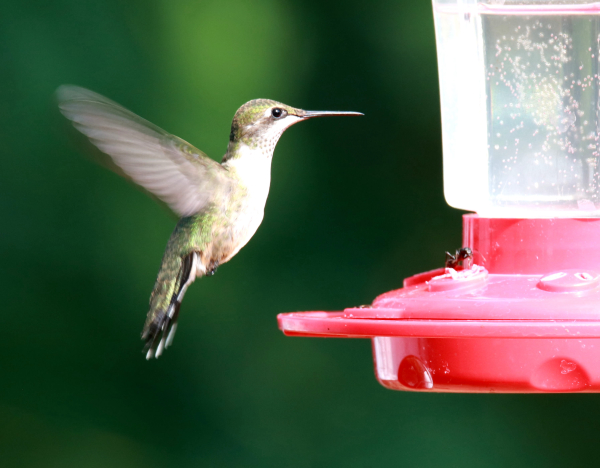
Photographing hummingbirds in flight is not an exact science, but the possibilities of getting action photos are best when the tiny birds hover for a moment, which often happens as they approach a nectar feeder or a perch (Ruby-throated Hummingbird photos by Paul Konrad).
Stopping all the motion of a flying hummingbird is not always possible, but some wing motion can be pleasing in hummingbird photos. A dark background provides an interesting option, but lighter-colored backgrounds are usually preferred. Try your hand at hummingbird photography when you next encounter them – it’s easier than you may think.
|
Hummingbirds create a lot of interest among birders, and with hummingbird migration and nesting in progress, depending on where you are located this may be the best time of the year to see hummingbirds at your nectar feeder and flower garden. This year, consider investing a little more time hummingbirding by trying to take a few simple photos of these flying dynamos. Start simple when they are perched at your nectar feeder, then try some flight photos – we bet it will open up a new area of interest in backyard birding for you.
Realistically, hummingbird photography is easier than you think. When we asked our Editor about his hummingbird photo experiences, Paul Konrad shared that he likes to spend about a half-hour at a time photographing about 15 feet away from his nectar feeder that attracts from 1 to 4 hummingbirds at a time. He added, “The enjoyable part of these photo sessions among hummingbirds is spending time standing in the green surroundings of my yard, appreciating the fresh air and quiet broken only by birds sounds. Best of all, I found that getting a few nice photos of hummers is pretty easy, so give it a try! I’ll bet you will get hooked by the fun of photographing hummingbirds little more than a dozen feet away.”
In the eastern half of the United States and southern Canada you will be photographing Ruby-throated Hummingbirds, although along the western tier of states you may find colorful Allen’s, Anna’s, and Rufous Hummingbirds, and in mountain habitats more Broad-tailed, Calliope, Black-necked, or other exciting species.
Whatever species visit your yard or nectar feeder, photographing hummingbirds is uniform and as we try to keep things simple, the main thing is to start photographing the birds. Then its easy to improve your techniques and you will surely be rewarded with impressive hummingbird photos. To try to help you get started and to provide a few short cuts, we share the following short tips:
Equipment – You don’t need an expensive camera and lens, but you will probably need something more than a cellphone’s camera to take photos you are happy with. Hopefully you have access to a simple digital camera with some level of magnification – maybe a small zoom lens.
Feeder Photos – Hopefully you have hummingbirds visiting your nectar feeder in your yard. But if you don’t already have a hummingbird feeder, consider setting up a sugar-water nectar feeder to attract hummingbirds. That, or photograph at an active feeder site at a friend or neighbor’s yard, or at a nature center or another site with hummingbird feeders.
Flower Garden Photos – You get the added color and shapes of flowers in your photos when photographing hummingbirds among flowering plants, and the birds tend to be hovering as they feed, which provides exciting photo potential.
Lighting – Watch the lighting to find when the prime time for photographing at a feeder or flower garden happens. Primarily, you want to position yourself with the sun at your back, with your shadow pointing at the feeder or flowering plants. Mid-morning and late afternoon tend to be the best times, when the sun is lower in the sky, providing the best angle of sunlight on your subjects.
Shutter Speed – Obviously, when trying to stop the ultra-fast action of hummingbirds, or at least slow the wings into a slight blur, we want to use the fastest shutter speed possible. This is easiest to do by setting your mode dial to Av (aperture priority), then dialing your aperture down to f5. In response, the camera will automatically set the shutter speed as fast as possible, depending on the light conditions.
Positioning – The nice thing about photographing hummingbirds is that they tend to be very trusting – you can usually photograph them from close quarters, say 12 to 15 feet, as long as you stay pretty motionless. Therefore you won’t need a blind, and you can photograph freestyle. If needed, or when needed, it may be helpful to move the feeder to a better location to take advantage of the ambient sunlight. This may be a matter of simply poking a metal shepherd’s crook hanger into the ground at an appropriate location and repositioning your nectar feeder on the hanger. But keep the new location near the initial feeder site, as the hummingbirds will go to the former feeder location looking for sugar-water – until they adjust to the new feeder position.
Background – Another reason you may want to reposition your feeder is to create an unobstructed background to emphasize the hummingbirds rather than having them in a busy or obstructed background filled with branches, etc. First, create as much space between the feeder and any objects in the background as possible. Then, by using an f5 aperture as described above, the background will more likely be out of focus in photos you take.
Setting Color – Try to position yourself to get a pleasing background color. A lighter shade of color is best – a beige or tan, a very light green or pale olive – these are good natural colors. Take a couple photos to check the background color, and see if taking a step to the right or 2 steps left improves the background.
Feeder Fotos – By all means, take a host of photos of hummingbirds feeding at your nectar feeder, but before you do, be sure your feeder is clean and filled with fresh sugar-water nectar – it looks better than a dirty needs-to-be-filled feeder in your photos (ha). You will soon appreciate that you can often get some of your best hummingbird photos right next to the feeder, where hummingbirds tend to hover a moment, or a few moments, before feeding. I tend to focus on the feeder, then wait for a bird to appear and hover, while keeping mildly aware of the background shadows and colors.
Add a Perch – Another tip for photographing at a feeder is to position a natural-looking perch 3 or 4 feet high and 3 or 4 feet from the feeder, for hummingbirds to perch on as they fly to the feeder, or to rest on after feeding. You can add a stick by simply pushing a sharpened end into the ground a few feet away from the feeder. Watch for a hummingbird to hover next to the perch, or perhaps it will flutter or stretch its wings while perched, thereby providing some action for pleasing photos.
Action Photos – Action photos are always the most impressive, and in addition to using the fastest possible shutter speed, your best bet is to try to take flight photos when hummingbirds are hovering, thereby providing your best potential of keeping the moving birds within the photo frame for a moment or so.
Fast Action – You are likely already aware of how quickly hummingbirds move, so photographing them will add a bit of energy into the equation. Try to be pre-focused on the feeder and anticipate the actions of the hummers. You will find it great fun; you will miss some photo attempts, but that’s part of the process. Take lots of photos, anticipate, react quickly, and enjoy any time you can devote to photographing hummingbirds.
We hope you have a chance to photograph hummingbirds during the rest of the spring and summer seasons. Of course, you can also use these techniques to photograph other birds, and this photo activity can help you to more thoroughly appreciate your surroundings as you relax in your yard, alert to the sounds and motions of the birds. Give it a half hour of your time, try it a couple times, and see if hummingbird photography adds something interesting, or exciting, or creative to select days – and Good Luck!
Share your backyard birding experiences and photos at editorstbw2@gmail.com