
There is almost no end to the different kinds of photography options that people use their cameras for, and even within the realm of bird photography there are many options you can appreciate. The goal of most birders is to try to take the best possible photos of birds they encounter. But there is another important level of bird photography to keep in mind and to emphasize when options arise – using your camera to document what you see.
An obvious example of how people use their camera as a documentary tool is when rare birds are photographed. In extreme cases it may be to document a first state record, or ninth provincial record, or even a county record. It’s almost imperative to have a photo of a legitimate rare bird to document the “almost unbelievable” sighting of a far-out-of-range migrant from Asia or a wintering bird from Europe.
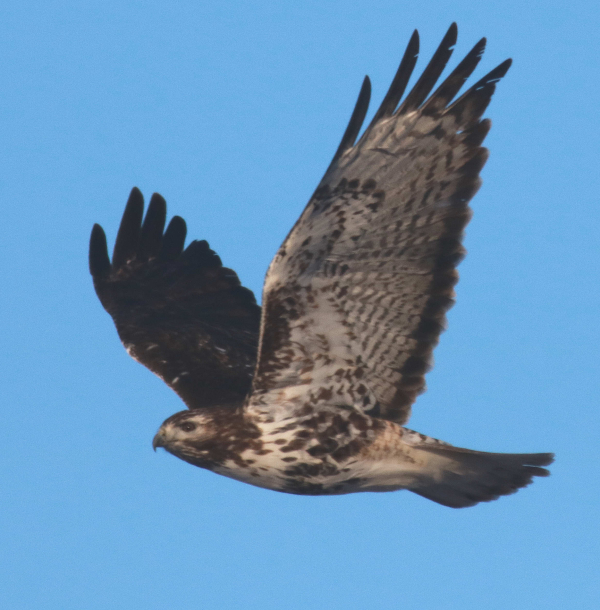
A light morph Harlan’s Red-tailed Hawk sighting was a highlight last week, but only by studying the details in the documentary photos was the hawk’s true identity revealed. The position of the hawk in flight was pleasing, but the image is not sharp; nonetheless, it shows the dark brown, almost black color of the plumage markings against the white base.
|
At the same time, many birders like to document personal sightings – certain birds of interest to you, or even a personal first for your life list. Many people include a few photos of birds they encounter as important additions to their e-bird reports, and most of these photos can be counted as documentary quality. Documentary photos are also widely used to document species or numbers of birds using your feeders and water features; and just as some birders keep lists of all the birds they see in their yards, some try to document all the species they see in their yards to keep in a file of photos.
Taking documentary photos can be helpful, important, fun, and they can add to our enjoyment of birds in many ways. They also can provide something of historical context to document highlights of your periodic birding activities. This is especially true for birding trips you take, whether they are day trips, overnighters a couple hundred miles away, or a more significant trip to another state or even another nation.
When you have your camera with you, it’s worthwhile to get in the habit of taking “documentary photographs” of birds you see, and especially birds you don’t get good looks at; birds you have trouble getting a definite I.D. on in the field. You will be surprised time and time again at what such documentary photos can reveal – especially when you get home and have the opportunity to view a digital photo or photos on the big screen of your home computer, or your laptop or large tablet in your vehicle.
Case in Point
Last Wednesday, was a classic case in point: While photographing a common bird – a Red-tailed Hawk – there were some circumstances that made documenting this bird as important as trying to get an impressive flight photo of the raptor. After initially seeing the raptor in flight, it began to hover. Of course, Rough-legged Hawk would be the initial I.D. call, but a closer look after it perched revealed it was actually a Red-tailed Hawk. It could have been helpful to take a photo of the hovering hawk to document the species, in case I didn’t get a better look at it – and I did take two photos of it as it hovered quite a distance away.
But I was lucky that the hawk flew in my direction and perched high overhead on a metal powerline tower. I had to reposition to get a better look at the bird with the aid of the afternoon sunshine, and through the binoculars I realized it was a Red-tail. I can’t remember the last time I saw a Red-tail in North Dakota during winter, but since I was along the Apple Creek treeline, not far from the woodlands along the Missouri River, this would be a likely place to see a Red-tail – even in February.
This Red-tail was different though; darker in color than the usual, almost black, with a dark belly band. I thought it was likely a bird from the Pacific Northwest, where Red-tails tend to be darker colored with more breast and belly color – maybe even British Columbia or Alaska – and that may also be a reflection of its choice of a northern winter locale. I looked away a moment, and the hawk was gone before I could take a documentary photo – darn.
I quickly looked around and caught sight of the Red-tail fluttering down behind me as though it was approaching prey on the ground. By the time I repositioned to face the raptor with the setting sun at my back, it had perched on an adjacent post where I could see its brown tail – at least it looked brown through my 8x binoculars – indicating it was a first-year Red-tail. That’s when I took a couple documentary photos of the bird, hoping for a photo worthy of using in my Editor Afield article this week.
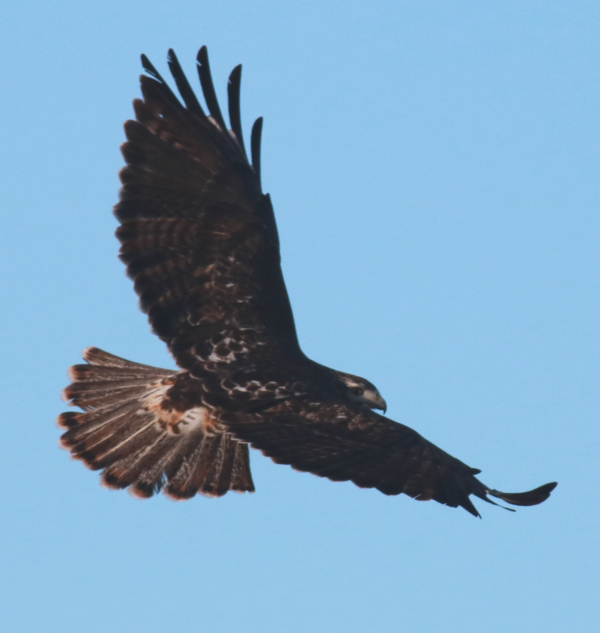
As the Harlan’s Red-tail banked in flight, it spread its tail feathers broadly, providing a good look at the true color of its tail.
|
The hawk proved to be very active, flying from perch to perch, but continuing to patrol the area in front of me where it had apparently spied potential prey. As it flew this way and that, banking at times, I had nice opportunities to photograph it in flight, hoping for a quality photo or 2, but getting some documentary photos at the same time. When I returned home and anxiously reviewed the photos I took of the hawk it was apparent that this “dark northern” Red-tail was actually a light morph Harlan’s Red-tailed Hawk. That would, in effect make it a bird from the northwest, as Harlan’s summer range is primarily in the forested areas of Alaska and the Yukon, so I was on the right track.
I arrived at the Harlan’s I.D. by taking a closer, better look at the tail. Initially, the tail confused me; in the field, even with the aid of binoculars and my camera’s telephoto lens, the tail looked brown, typical of a first-year Red-tail (they get their orange-red tail feathers after the first year). But a closer look at the digital photos I took of this hawk as it flared its tail during banking flight – enlarged on my computer screen – showed the tail was actually colored dappled gray with brown and black terminal bands. Simply described, Harlan’s tails tend to have that dappled design, colored gray, brown, or black, sometimes with orange, white, or red highlights – unlike more typically colored Red-tails. It all made sense at that point, because Harlan’s tend to be darker in color, and that’s why this hawk’s body and wing plumage was almost black and white in color.
Harlan’s are special hawks, and many raptor authorities believe they should still be considered a separate species – William Clark foremost, among others – and I agree considering Bill’s excellent scientific case for returning Harlan’s to full species status. I’m most used to seeing dark morph Harlan’s during spring and fall migrations through North Dakota, and have really only seen a few light morph Harlan’s that I’ve observed wintering in south-central South Dakota. Documenting this Harlan’s Red-tail turned out to be significant, not only for getting the best possible I.D., but to add a piece of information about Harlan’s wintering in the northern Great Plains.
Practice & Tech Ops
By having your camera within reach as a valuable part of your birding equipment, you have the tool to document the birds you see, as you see fit. Taking documentary photos of birds also provides valuable practice that you can use when opportunities to take higher quality photos of birds arise. Technically, you should always be ready to take top-notch photos, and that way there is no question of whether you need to make any changes to take a couple initial photos.
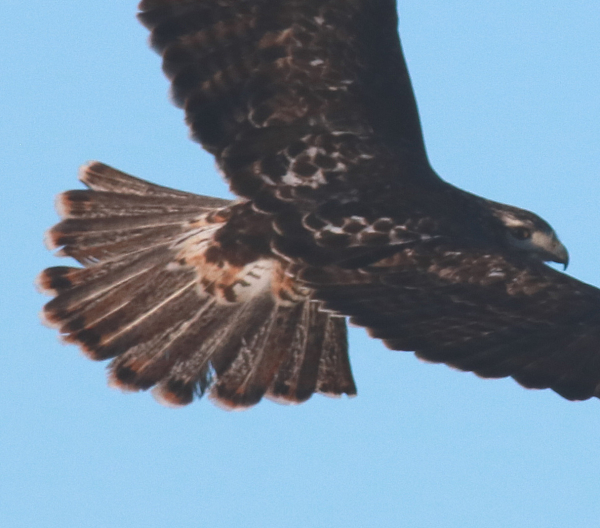
By enlarging the tail feathers in the above photo, it was interesting to study the dappled gray coloring that revealed the true identity of this hawk.
|
You may remember that on a sunny day, I have my camera preset to an ISO at 400 with the aperture at f8 or f7. I keep the Mode Dial on my camera turned to the Av preference, which uses the aperture setting to automatically provide the corresponding shutter speed will usually be between 1/1200 to 1/2000 – fast enough to stop most motion. When I’m in position to photograph a bird, I take a documentary photo or two, then consider if I can improve my settings under the conditions at hand – perhaps to change the f-stop to f5 to reduce the focus of the background.
I usually refrain from photographing when it’s cloudy, but documentation photos are always fair game. If it’s overcast or at the end of the day, for documentation purposes you can adjust your ISO to 800 or higher to increase the camera’s sensitivity to the available light, and thereby get a faster shutter speed and/or broader area of focus by changing the f-stop, depending on what you intend to do under given circumstances.
Ultimately, documenting your birding activities with your camera will help you become a better birder. It can help improve your identification skills, practice and expand your photo skills, and allow you to keep something of a running history of your birding activities, which can also help you see your improvements as a bird photographer over the years. What fun!
Article and photographs by Paul Konrad
Share your bird photos and birding experiences at editorstbw2@gmail.com