
When you have an attractive bird before you, a trusting bird in close range, you spend as much time as you can with it and do what you can to take a variety of photos. During that shared time, you get a feeling of familiarity with the bird, and with luck, it will provide you with different looks. Sunday an especially attractive young Red-tailed Hawk provided a gamut of opportunities for me to test my reflexes and adjust to changing conditions and varied opportunities presented. It was a good example for me to share with you and other readers to show how you can pivot to make the most of changing light, weather, and bird behavior during an extended photo session.
The day had been the kind of day you would order if you could – clear blue sky, remarkably fresh air, 75 degrees with the slightest hint of a breeze; all during a peak period for migrating raptors that overlaps with the post-fledging period of some local nesting hawks. After seeing excellent numbers and variety of species the previous days, I decided to do an afternoon big-circle drive to the west and northwest of my office and count all the birds of prey along the way. Of course, I was hoping for a few photo opportunities too – as always.
The count went well, with totals of 41 Red-tailed Hawks, 13 Swainson’s Hawks, 7 Northern Harriers, and a mile before I reached home, a young Merlin! That’s 62 raptors in all – not bad considering there are no concentrating areas; the raptors were scattered across the wide-open prairies, hayfields, and croplands in this region of Dakota.
I didn’t find a hawk I wanted to photograph until Red-tail number 15, almost halfway through my drive. That was a big female with a very white head that provided an opportunity to photograph it perched and as it circled overhead, but the photos didn’t have the “pop” I was hoping for, and the flight photos weren’t very impressive – but that’s all part of the effort, isn’t it? Sometimes you think you hit a home run, and it turns into a single or a foul ball. Other times, you think you missed the sweet spot, but the ball goes out of the park – same thing with photography – and I think that photo session was more of a long single. The good news was the conditions were right with great sunlight at my back, the bird was close, perched at eye level, and when it took flight it circled back my way for a couple big swings overhead – nice.

A surprise rogue cloud dramatically changed the lighting and color saturation of the bird, that puffed out its belly plumage before reacting to potential prey.
|
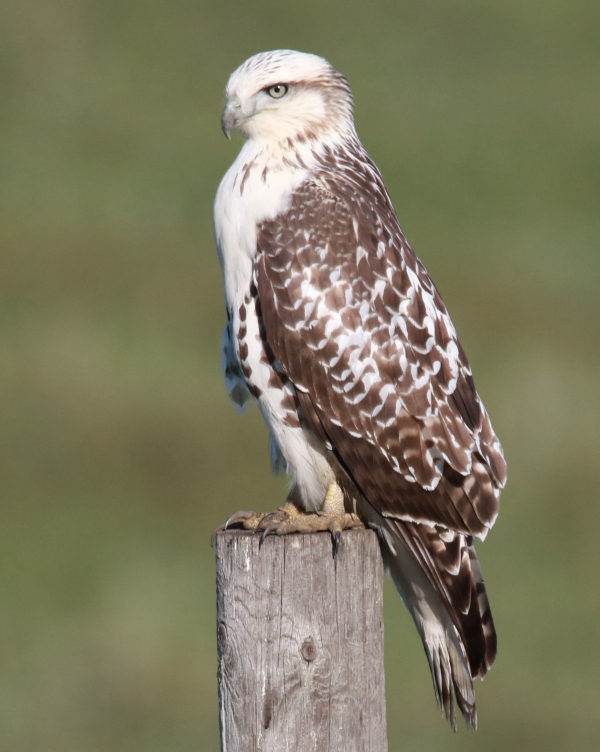
More Swainson’s Hawks were present along the next quarter of the drive, but about ¾ of the way around the circuit a bird caught my attention from quite a distance as a very white hawk with a prominent white head – probably a Krider’s Red-tail. I eased up as I approached the bird and coasted into position when I saw it was a beautiful young hawk, very white with its wing and back sporting scalloped colors of beige and brown. I held my breath as I began taking the first photos with the hope that the bird would permit me to share its space a bit.
It barely seemed to notice my mobile blind in position, and mostly looked in the opposite direction, casually hunting the lush green hayfield, fed by recent weeks of rain. The hawk was truly beautiful, and it was just the bird I’ve been hoping to photograph recently. I had seen a similar young Red-tail 8 days earlier north of my office and wished I could photograph it, so this was a great opportunity to fulfill that wish with a second Krider’s-like bird.
Techniques
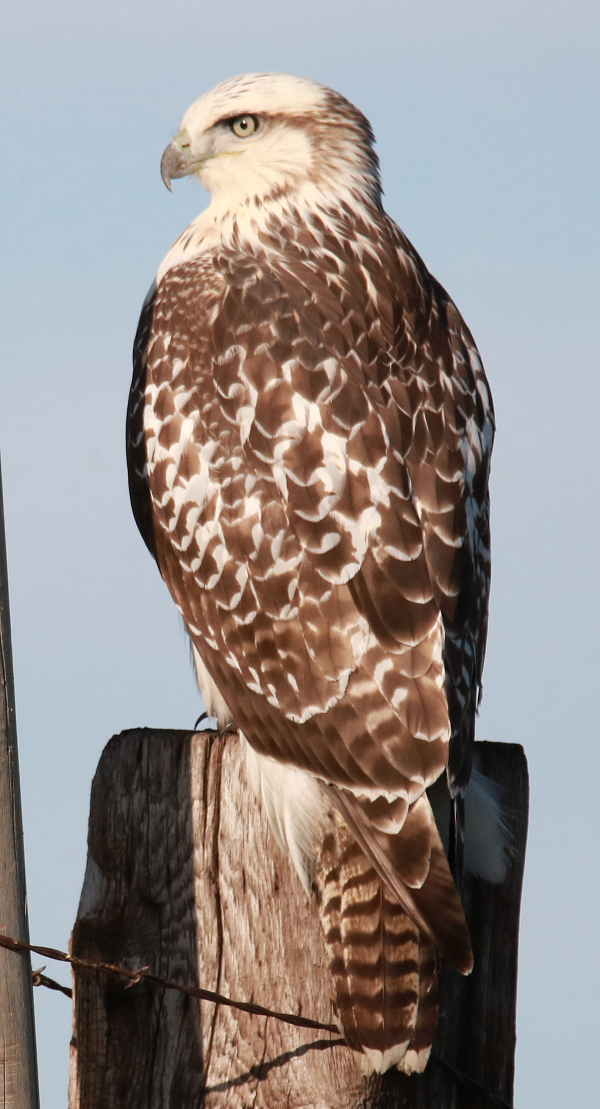
As I began photographing the young hawk, the sun was at an optimum angle at about 6:30pm. The light was directly behind me and no shadows were evident due to my position exactly between the sun and the bird. While photographing, I do a number of things to improve my techniques, many of them I now do automatically, without thinking about doing them:
- My mobile blind was turned off, eliminating any vehicle shake or sound.
- Staying inside my vehicle and reducing any motions I make helps to make the bird less wary.
- I braced my camera lens against the window frame to help eliminate any body shake, which can be as subtle as your heartbeat when hand-holding a telephoto or zoom lens.
- I held my breathe any time I took a photo to reduce any body shake even more.
- I lightly squeezed my finger down on the shutter release button to reduce any jerky motion.
Even before I begin photographing, I work within a simple framework of planning:
- I usually only photograph in the morning and evening, when the sun is at a 30- to 60-degree angle to the ground.
- When it’s cloudy, I do something other than photograph, because good photos require good sunlight.
- I preset my camera and lens to the most likely settings for the lighting conditions; usually f7 using the aperture-preference setting (Av), with an ISO of 400. With the Av setting, the camera automatically sets the shutter speed under the ambient lighting conditions. You can adjust the resulting shutter speed by changing the f-stop, although you also change the area in focus in the process.
- For optimum lighting, I try to position myself between the sun and the bird, with my shadow pointing at my subject.
- Watch for distracting shadows on the bird or around it as you get into position, while watching the area behind the bird for any distracting elements or unnatural colors.
My next surprise didn’t come from the young hawk, it came from the sky – a rogue cloud suddenly shaded the sun. The resulting light was dramatically different from the sunlight-drenched look at the hawk before. To try to compensate for this I switched my ISO setting from 400 to 800, and changed my aperture from f7 to f6 to try to make the most of the dramatically reduced light – just in case something should happen that I needed to document before the sunshine returned to view.
At first, I took a couple photos just to document the change of light, and the affect of changing the camera settings. In short order, the hawk puffed out its belly feathers, showing its white underside plumage better, so I photographed that too. But a quick change happened about then: The hawk leaned forward and focused on something – and not for long. In a moment the raptor took flight and angled just past my lens and mobile blind, giving me a chance to try to get a quick action photo as it made its move.
With the lesser lighting scheme in play, none of the photos turned out; all were blurred from low shutter speed – or they were out of focus, which can happen when the bird is close; the autofocus has a hard time adjusting to the quickly changing distances and motion. The young hawk flew low across the road to pounce on potential prey that I couldn’t see. I watched for its next move, and waited for the sunlight to break out from behind the lone cloud. The hawk apparently missed its mark, and flew to another post, but I waited for the sun to break through before trying to reposition.
The Best Success
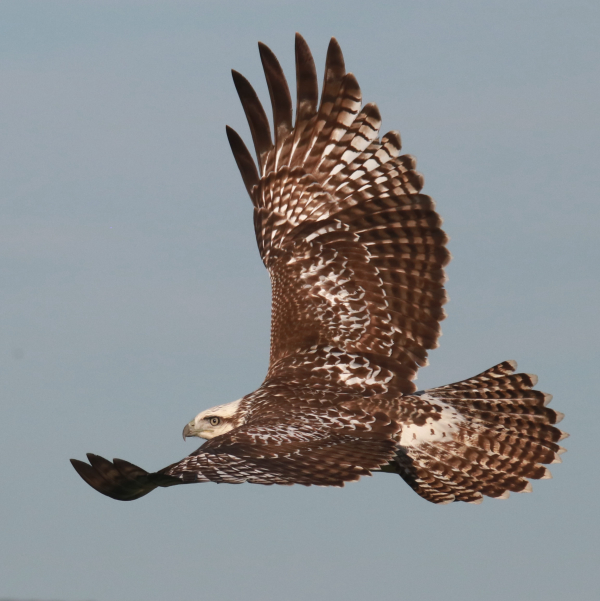
Here comes the sun; so I approached the hawk again, coasting into position hoping the hawk’s trust was still intact. I took a couple photos, but the hawk settled down on a post with a taller pole adjacent to it – too close, and it added a slight shadow to the left side. But moments later, a loud tractor with a trailer approached the location, and the hawk became alert, then took flight. I was ready and followed its moves for a final series of photos. One image in particular stands out as the prize for action photography during that photo session, with the hawk’s tail feathers spread wide and its wings spread high above its back showing every detail of its dorsal plumage. Although the hawk was angling away, it showed its white head, the only indication on its dorsal side that it had any Krider’s coloration.
For this photo, the last illustrating this article, I used the Al Servo setting on my camera, which permits me to take a succession of photos at a rate of up to 5 per second. Using this setting allows you concentrate on following the bird’s quick movements and keeping it within your photo frame. If you are using a zoom lens, as I was, you should be prepared to zoom out in anticipation for a bird to take flight, which I did. That way, after taking some close-ups of the bird at full zoom, I reduced the zoom magnification as the loud tractor approached; thereby providing more room for the spread wings and action when the bird took flight.
The moral of the story is to make the most of a photo opportunity by approaching a bird cautiously, not getting so close that it becomes alert; although finding a trusting bird in the first place is not always an easy process. Some birds are trusting, others fly long before you get within range. Many of the young birds that are present at this time of the year tend to be more trusting and permit a closer approach, thereby offering better photo opportunities. Then utilizing the best lighting position, and being prepared by presetting your camera and lens to the most likely settings for the lighting conditions really pays off.
I don’t try to photograph every bird, I pick my options keeping the birds’ best interests in mind. I try very hard not to flush birds, trying to get within a reasonable distance and in some cases, let the bird come to me. Sometimes, an approach can take more than one stage too, with a stop at a distance to let the bird become a bit familiar with you or your vehicle, then easing a bit closer, maybe stopping one more time before moving into the best position with reference to the sunlight’s direction.
It’s a great time to photograph birds, and as the weather changes with the season, and early migration advances, it’s a great time to dedicate a bit more time to bird photography. Get out and feel the pulse of nature, take deep breathes of fresh air, get your walk on in birdy places, camera in hand. Get out there and look for your next photo challenge and your next favorite photo. Good Luck!
Article and photographs by Paul Konrad
Share your bird photos and birding experiences at editorstbw2@gmail.com