
When the opportunity arises – take advantage of it. With a peak high count of nine Ruby-throated Hummingbirds at my nectar feeder last week, how could I resist trying some hummingbird photos! I invested 40 minutes of time now and then, day to day, and the time was well spent for the photos yielded. The enjoyable part of these photo periods was spending time standing in the green surroundings of my yard, appreciating the quiet and fresh air among hummingbirds. Best of all, I found that getting a few nice photos of hummers is pretty easy, so give it a try! I’ll bet you will get hooked by the fun of photographing hummingbirds just a dozen feet away.
Hopefully you have hummingbirds visiting your nectar feeder in your yard. But if you don’t already have a hummingbird feeder, consider setting up a sugar-water feeder to attract hummingbirds. That, or photograph at an active feeder site at a friend or neighbor’s yard, or a nature center or other site that provides hummingbird feeders. You can also check out local flower gardens at public sites, although the birds tend to be less focused or concentrated compared to when there is a feeder available. Even so, you get the added color and shapes of flowers in your photos when photographing hummingbirds among flowering plants, and the birds tend to be hovering as they feed, which provides exciting photo potential.
In the eastern half of the country you will be photographing Ruby-throated Hummingbirds, although along the western tier of states you may find colorful Allen’s and Rufous Hummingbirds, and other exciting species. Although this year is an exception, some people make special trips to the Texas Gulf Coast during mid-September to see the concentration of hummingbirds – the Rockport-Fulton area is an excellent bet. Others visit southeast Arizona to photograph the greatest variety of hummingbirds in America during August and September at one of the infamous feeding stations – the Paton Center for Hummingbirds is most notable in the Patagonia area.
Lighting Surprise
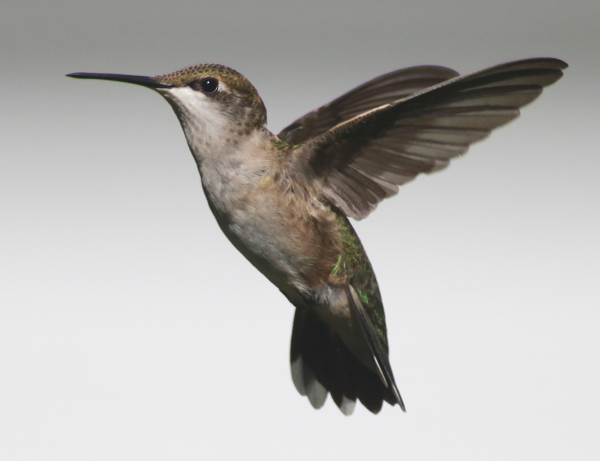
Photographing hummingbirds in flight is not an exact science, but the possibilities of getting action photos are best when they hover for a moment, which often happens as they approach a feeder, another food source, or a perch.
|
Inspired by the Ruby-throat action outside my bay windows, I watched the lighting to find that the prime time for photographing at my feeding station was between 11am and 1pm, when tree and building shadows permitted the sun to illuminate the hummer action best. Now that might seem like poor timing for photography – even to me – but sometimes you need to give it a try anyway, and it became clear that the sun is starting to position farther south already, providing a better lighting angle during those midday hours.
Shutter Speed
Obviously, when trying to stop the ultra-fast action of hummingbirds, or at least slow the wings into a slight blur, we want to use the fastest shutter speed possible. This is easiest to do by setting your mode dial to Av (aperture priority), then dialing your aperture down to f5. In response, your shutter speed will be as fast as possible, depending on the light conditions.
Positioning

Stopping all the motion of a flying hummingbird is not always possible, but some motion can be pleasing in hummingbird photos. Although the wings show the fluid motion of flight, notice the sharpness of the eye and bill. A dark background, provides an interesting option to lighter-colored backgrounds, which are usually preferred.
|
The nice thing about photographing hummingbirds is that you can photograph from close quarters, say 12 to 15 feet, as long as you stay pretty motionless. So you don’t need a blind, and you can photograph freestyle. Position yourself between the sun and the feeder, so your shadow points at the feeder, and you’re ready to go.
If needed, or when needed, it may be helpful to move the feeder to a better location to take advantage of the ambient sunlight. This may be a matter of simply poking a shepherd’s crook hanger into the ground at an appropriate location and repositioning your nectar feeder on the hanger. But keep the location very near the initial feeder site, as the hummingbirds will go to that site with or without a feeder looking for sugar-water – until they adjust to the new position.
Another reason you may want to reposition your feeder is to create an unobstructed background to emphasize the hummingbirds rather than loose them in a busy or obstructed background. First, create as much space between the feeder and any objects in the background as possible. Then, by using an f5 aperture as described above, the background will more likely be out of focus.
Next, try to position yourself to get a pleasing background color. A lighter shade of color is best, a beige, tan, a very light green or pale olive are good natural colors. Take a photo, or a few, to check the background color, and see if taking a step right or two steps left improves the background. Then too, you may need to bend lower for a moment to get the right background in your photo frame.
Feeder Fotos
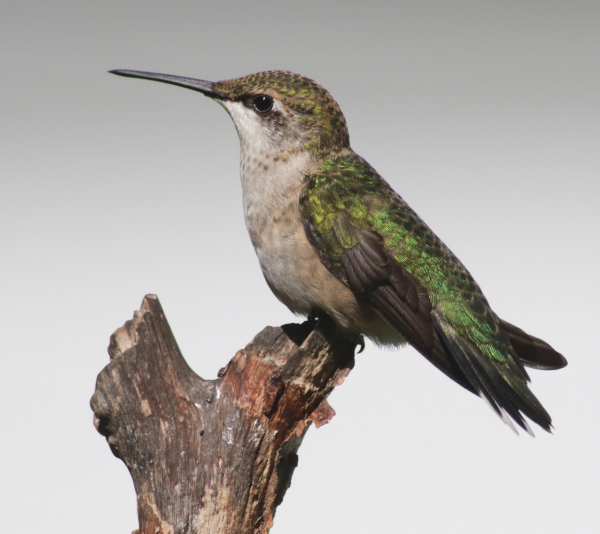
By all means, take a host of photos of hummingbirds feeding on your nectar feeder, but before you do, be sure your feeder is clean and filled with fresh sugar-water nectar – it looks better than a dirty needs-to-be-filled feeder in your photos (ha-ha). You will soon appreciate that you may get some of your best hummingbird photos right next to the feeder, when hummingbirds tend to hover a moment, or a few moments, before feeding. I tend to focus on the feeder, then wait for a bird to appear and hover, while keeping mildly aware of the background shading and colors.
Add a Perch
Another photo ploy at a feeder is to position a natural-looking perch four or five feet high near the feeder for birds to perch on as they approach the feeder, or rest after feeding. I usually add a stick by pushing a sharpened end into the ground a few feet away from the feeder, although I think I need to get some new, more attractive sticks for my next feeder photo session. Sometimes I’ve been lucky to have a hummingbird hover next to the perch, or flutter or raise its wings while perched – thereby providing some action for pleasing photos.
Action photos are always the most impressive, and in addition to using the fastest possible shutter speed, your best bet is to try to take flight photos when hummingbirds are hovering, thereby providing your best potential of keeping the moving birds within the photo frame for a moment or a few.
Lens Selection
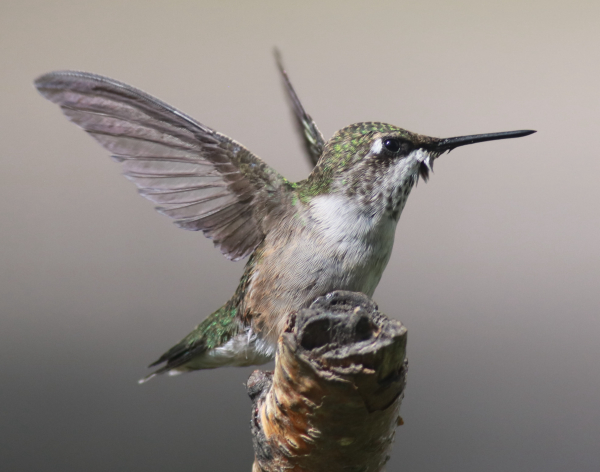
The delicate wing feathers of a Ruby-throated Hummingbird will carry her on a miraculous migration to the tropics of southern Mexico or Central America during the coming month. Try your hand at hummingbird photography when you next encounter them – it’s easier than you may think.
|
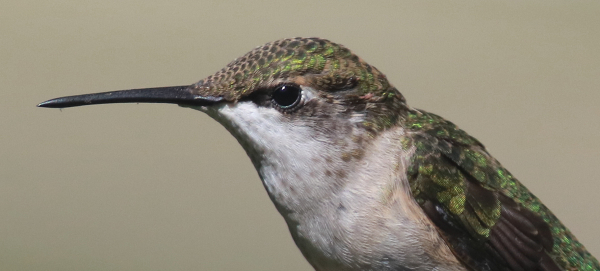
A surprising by-product of photographing hummingbirds in close proximity was getting some images that are especially well-focused and sharp enough to really crop in to show the impressive detail our digital cameras and quality lenses provide. Because you can get close to hummingbirds without impacting their behavior or feeding opportunities, you can use a smaller telephoto lens, even in the 200mm range, although a 300mm lens may be the best bet.
A zoom lens works well, but you will find there is little need or time for zooming in or out owing to the fast flights of the hummingbirds. I used my trusty 400mm telephoto lens; it worked well for the subject matter, I enjoyed using it, and I’m most comfortable using it because it’s my standard bird photography lens. In short, almost any lens that provides some level of magnification will do; you just need to make it work for your conditions.
I sure hope you have a chance to photograph hummingbirds yet as cooler temperatures embrace the northern tier of states and send ever-growing concentrations farther south. I found it to be a personally enjoyable and fulfilling addition to my usual photo options. The activity helped me thoroughly appreciate my quiet surroundings as I stood motionless in my yard, alert to the sounds and motions of the plants and trees, birds and bees, dragonflies and butterflies. I spent a half-hour one day, 40 minutes another, two half-hours with a break in between another day. Each of those photo sessions was enough to satiate me to move on to my next task of the day, and hope for more hummingbird photo opportunities the following day. Enjoy your yard, your feeding station, and the birds they attract during these beautiful September days.
Article and photographs by Paul Konrad
Share your bird photos and birding experiences at editorstbw2@gmail.com