
It’s always good to review some basic information about bird photography, and considering we are in the midst of one of the most exciting times of the year for birding, I thought the timing is right to share my expanded list of basic bird photography tips:
– Keep the sun at your back, so the sunlight illuminates your subject as directly as possible.
– Your shadow is a good indicator of the direction of the sunlight; keep your shadow pointing at your subject.
– Speaking of shadows, be aware of shadows on the bird you are photographing, caused by the angle of the sun when you’re not in the best position. Often, in the field you don’t notice a shadow, but because shadows are more obvious in photos, it’s good to watch specifically for shadows and adjust your position to avoid them when possible.
– Speaking of the angle of the sun, mid to late morning and late afternoon provide the best angle of the sun for photography, when the sun is between 30 to 60 degrees above the horizon. (When the sun is directly overhead it is at 90 degrees with reference to the horizon at 0 degrees.)
– On cloudy days, I find something else to do. Bird photography is always best when there is adequate sunshine from the optimum direction and angle. Sunny afternoons and mornings are best, so find something else to do during midday when the sun is overhead.
– If you try to approach a bird, keep a low profile, move slowly, and don't walk directly at the bird; move at an angle to the bird that gets you ever closer, slowly zig-zagging if necessary, while keeping the sun at your back.
– Try not to get too close to birds; allow them to behave naturally. When you stop short of making birds fly, they may actually move closer in your direction.
– Anticipate the next move of the birds you are photographing, and be prepared for that action.
– Focus on one eye of the bird to be sure your focal point is in the middle of the bird. If the eye is not in focus, your photograph will suffer.
– Hold your breath any time you press the shutter button to help eliminate body motion.
– When photographing birds, stabilize your camera and lens as best you can to reduce any body shake that could be transferred as you hold your camera. Lean your lens against a tree, window frame, or another stable option. When photographing in the open, you can brace your elbows against your body as you handhold your camera and lens.
– Some birders use a tripod to help stabilize their camera and lens, but for many of us using a tripod is cumbersome at best, especially when photographing flying birds. Dealing with a tripod, frankly, takes much the fun out of bird photography. If you use a tripod, then you should also use a shutter release cable.
Tech Basics
– Never use the automatic setting on your camera. Instead, it’s best to set the Mode Dial on to the Av preference; then set your aperture (f-stop) and the camera will automatically provide the associated shutter speed as determined by the amount of available light.
– I preset my camera so I’m ready to take a photo at a moment’s notice, which happens fairly often when photographing birds. When I’m in position to photograph and have an extra moment, I double-check the settings and adjust any if needed. During sunny days, I preset the ISO to 400, use an aperture to f8; and the resulting shutter speed will usually be between 1/1200 to 1/2000 – fast enough to stop most motion.
– Personally, I find the 400 ISO setting to be the best under good sunlight conditions. I tend not to photograph during low light periods, but if the sun goes behind a cloud, I increase the ISO to 800 if the shutter speed is reduced significantly by the reduced light. I find that any setting above ISO 800 tends to produce grainy photos. Using an ISO of 200 or 100 provides better quality images, but these settings limit your shutter speed and/or aperture a bit, so ISO 400 seems to be a good bet for me for bird photography with the sun at my back.
– I keep my camera’s Al-Servo set so I can take a continuous series of photos. Using this setting, you can take a single photo, but you can also take 2 or 3 at a time if you hold the shutter button down a moment longer. And when a bird is especially active, such as when it’s flying, you can hold the shutter release button down for the camera to take a continuous series of images at a rate of 3 to 10 photos or more per second, depending on the camera model you use.

– Keep aware of the background of your photo. Try to eliminate distracting twigs and grass from view, which may be a matter of taking a step right or left in some cases to get a clearer background that will be less distracting. However, in some cases a twig with budding leaves or other vegetation can add a natural setting to a bird photograph.
– Getting a more uniform background can be accomplished with some success by reducing the area of focus (depth of field) to throw the background out of focus. This blurred effect helps to emphasize your subject, and is accomplished by setting your aperture to a narrow f5 or f6. That aperture should keep your bird in focus while blurring the background, although this only works well if there is some space between the bird and the background elements.
– A narrow f4 or f6 aperture also provides a faster corresponding shutter speed, which is helpful in stopping the motion of fast-moving songbirds and creating sharp images.
– It’s fine to have plants or other natural elements show in the background, and in some cases you will want to embrace the background. Then, you may wish to increase the area in focus around the bird by dialing the aperture to f11 or f14, as long as you have plenty of shutter speed to work with – say above 1/400 for a motionless bird, and 1/1000 or more for birds in flight.
Using a Mobile Photo Blind
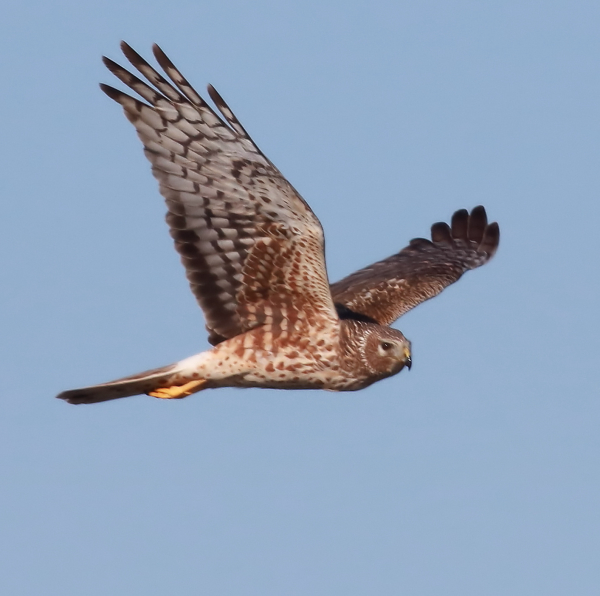
Taken Saturday morning, this image was one of a series of photos taken of this female Northern Harrier in flight over an area marsh. Having a series of flight photos to select from can provide a number of images with different wing positions.
|
– I like to use my vehicle as a comfortable mobile blind. Birds tend to react to people, but ignore a parked vehicle. Pull safely off the side of the road in the best possible position to photograph your subject with respect to the direction of the sunlight.
– Your vehicle provides an option to reposition a few feet forward or back when necessary, or drive onward to look for the next photo opportunity.
– Turn off your vehicle any time you are photographing to keep your camera lens as stable as possible.
– Stabilize your lens on the top of a slightly raised window or the side of the window frame to reduce any body shake that may be transferred as you hold your camera. Also hold your breath when you press the shutter button.
– Explore a more expansive area occasionally to monitor where the birds are – and where they aren’t. Take advantage of photo opportunities you encounter along the way, and plan for future photo opportunities with respect to the time of day the sun will illuminate a promising area best.
Photo Composition & Design
– Try not to center a bird in the middle of the photo; leave a little more space in front of the bird for it to ‘look into, walk into, or fly into.’
– To better understand how to position a bird within your photo frame, I suggest taking a quick look at the “rule of thirds,” which artists often use when composing their works. Photographers also use this technique for photo framing and design, although it is just a guide to be aware of when composing photos.
– Sometimes you can position a bird within the frame while initially taking a photo, which is easiest when using a zoom lens. But you can always reframe the photo and thereby reposition the bird in the frame by simply cropping the image using photo editing software.
– When using photo editing software, I alter the photo as little as possible, but simple cropping of an image can improve a photo immensely, and it can increase the size of the bird(s) in a photo frame by cutting out extraneous parts of the background – effectively zooming in on the bird.
– Try to keep up with your photo review and editing, preferably after each photo session. Keep your photo files orderly and easy to access.
– Keep 2 copies of all your photos, preferably in different locations, to ensure you never “lose” any of your valuable photos. It’s easy to keep your photos on external hard drives, separate from your computer, although it’s always convenient to have a file of favorite photographs saved on your computer.
– And when photographing birds, there is always the luck factor – Good Luck!
Article and photographs by Paul Konrad
Share your bird photos and birding experiences at editorstbw2@gmail.com