
A few years ago I found a beautiful chocolate-colored hawk in central Arizona. That fall a nice diversity of birds of prey collected in an area east of Phoenix, including such exciting birds as a couple Peregrine Falcons, a female Merlin, a first-year Ferruginous Hawk, and a variety of Red-tailed Hawks. Among the Red-tails was the big first-fall dark morph Red-tailed Hawk that I had on my radar for a few days, when the brown beauty provided nice perched and flight photos when our paths crossed. One particular photo of that attractive hawk caught my attention: The hawk was in a most expressive gliding flight tipped in just the right way to get the full effect of the sunlight illuminating its full spread wings and tail from above with a full side view of its face – all beautifully in focus.
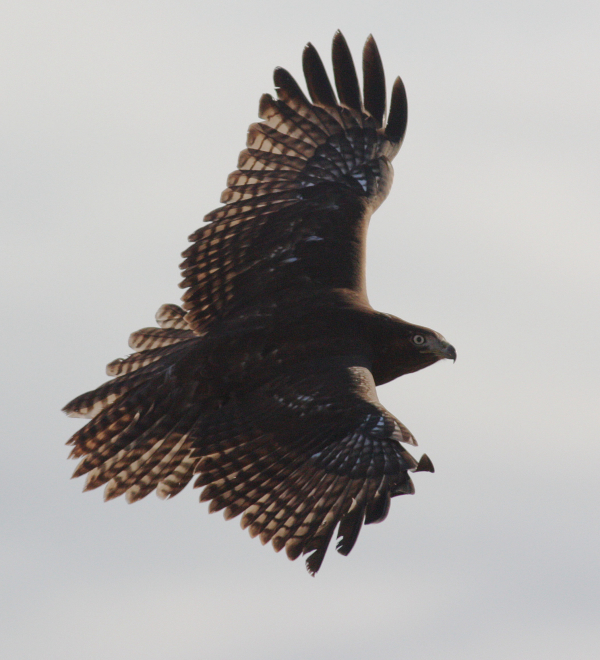
Uncharacteristically, this photo is back-lighted; the sunlight is coming from behind and before the hawk, which served to highlight the markings on the extended wing and tail feathers. Sometime after cropping the photo a bit, I had an enlargement of the photo printed and mounted, which I hung in my home office on the beach in San Diego, along with a few other favorite images taken during that period.
One evening, while relaxing before hitting the field the next morning to check the status of a variety of bird nests in the mountains east of San Diego and just north of Mexico, a great creative idea came to mind: What if I copied the original digital image into my desktop darkroom, and made an opposite image of it – a mirror image. I quickly followed through, using Paintshop Pro photo editing software. The process was very easy; I simply opened the photo in the software program, and among the top headings I clicked on “Image.” That opened a long list of options that included “Mirror.” I clicked on that word and my wish was made a command – there it was, a mirrored image.

Well, that was easy enough, so placed the 2 images of the chocolate hawk on the screen facing one another. That was interesting, but almost immediately I realized I could take this process another simple step farther and make the mirror image into a negative.
I quickly followed through, returning to the top heading of “Image,” clicked on that to reveal the list of options that included “Negative.” I clicked on that word and the magic happened instantly: On the screen the brown hawk with tan markings turned into a white hawk with surprisingly blue markings! And it was spectacular! At the same time, the white background changed to a dramatic black background; the photos were like night and day – literally.
I was so impressed with the new “white hawk at night” image that I promptly had an enlargement of it printed in the same size as the “chocolate hawk during day” photo. Of course, when I brought the mounted image into my office, I couldn’t resist laying them down on the floor to compare them side by side. But that’s when another little creative thought crossed my mind: Combine the photos face to face as a single mirror image – the ying and yang.
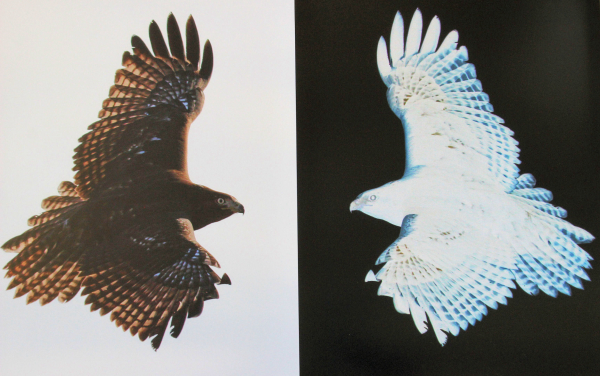
But now I was left with a small dilemma. I couldn’t figure out how to merge the 2 images facing one another in Paintshop Pro, so I decided to do it old school style. I took a photo of the 2 photos facing one another, and returned to the photo studio to have an enlargement printed; and bingo, that created a unique image using the initial photo of the young chocolate Red-tail in flight!
Now, I’m guessing that some birders among our readership know how to combine 2 photos using Paintshop Pro or PhotoShop or another photo editing program, but this mixed method was all I could come up with at the time, and it worked. You can’t see a seam between the photos and they melt together perfectly. It may have taken an extra step, and an extra trip to the photo studio, but it worked, and sometimes it’s more about following through with the creative process than it is about the technical side of things.
Bird photography is sometimes about the creative process after you take the photo; and in this case, I could never have imagined what that negative image of the hawk would look like – white with blue highlights against a black background – amazing, especially when coupled with the original photo and positioned face to face. How fun! So take a second look at some of your bird photos, squint hard, maybe drink a little wine (if you’re old enough), and see if you can get your creative juices flowing in an unanticipated direction. Or just start trying a few new photo editing options hidden in the depths of your photo editing program – you never know what kind of artistic image you might come up with. Have Fun!
Article and photos by Paul Konrad
Share your bird photos and birding experiences at editorstbw2@gmail.com