
Actually, there is more to this article than the title suggests. We’ll go far beyond “documenting” ducklings. But as this banner year of duck reproduction begins, I can’t help but focus on the opportunity to photograph broods and even individual ducklings, along with the female ducks that guide them through their first weeks, and often long thereafter. Most ducks are tied to water, so water conditions, colors, backgrounds, and the birds themselves will play into most photographs we take, especially as light adds to the mix of variables that will help enrich, or detract, from a given photo.
Ducks are pretty wonderful birds, and I’m lucky to live in the midst of one of the best duck production areas in the United States. Therefore, I’m in prime duck photography habitat within moments as I travel in any given direction by the first of July – and it gets better week by week into August. Each week new broods of different species are hatching, and different age groups are already evident, thereby providing a diverse and ever-changing duckscape. Of course, these techniques can be used when photographing other waterfowl and waterbirds too, and many are universal for bird photography.
As with any birds, try not to disrupt or displace ducks with broods, especially hens with young ducklings. Usually you can find hens with broods that don’t react to a cautious approach.
Focus – When photographing duck broods, it’s usually best to focus on the eye of female. If the female’s face is in focus, the rest of her will be focused too, and the ducklings surrounding the hen should also be in focus. If you’re lucky, the ducklings will all be in the same plane, which gives you a better chance of having them in focus – given a relatively wide depth of field.
Aperture – It’s helpful to have your aperture pre-set at f8, which will give you a relatively wide depth of field to start with. After you have taken a couple photos, it’s worth checking your shutter speed, to better adjust your aperture. Usually, there is not a lot of action among the ducklings, so you can get by with slower shutter speeds down to say 1/500 second or less to stop most duckling motions. Therefore, you can increase the aperture to f10 or so when your camera indicates your shutter speed is faster than that. A wider aperture will ensure the best chance of keeping the entire brood in focus.
Light Direction – As always, it’s best to have the sun at your back, so your subject is bathed with light. You can double-check the direction of the sunlight by asserting your shadow is pointing toward your subjects. Sometimes while photographing a brood of ducklings, you can see changes in in the color of the downy feathers when they turn their head or body, so you may be able to time your photos to get the best lighting and color during your photo time.
Setting – It’s hard to plan a setting for a duck brood, but it’s usually a good bet you will find most broods in water. It’s nice to have a duck brood in tranquil unobstructed blue water, but most images will have ripples on the water, which can add pleasing depth and color variations. Some will have gray water (reflected from a cloudy sky), and to avoid windy conditions females often keep young broods in shallow pools of water surrounded by vegetation, which may provide a pleasing green background or reflection.
Background – The background should be natural, but a uniform or undistracting background is usually preferred. If it’s more water, that works very well. If its vegetation, that can add a dimension, or add green color behind the blue water. If the vegetation is recessed a distance, it may be deemed out of focus and provide a mostly uniform green background. Then too, if the veg is surrounding the brood, it can show the ducklings concealed within their surroundings. Often, you take what you get – ultimately the ducklings will dictate the setting and background and we can only document the scene and the birds as quickly as possible before everything changes – although a change in background can be good too.
Shadows – It’s best to avoid shadowed areas; restrict your photography to well lighted areas to get the best quality photos. Even background shadows will turn your background black, which usually isn’t the best for wildlife photos; however, some people welcome a black or dark background, sharing that it helps to “pop” the lighted subjects out from the background.
Reflections – Reflections can be good, bad, or indifferent to photos, but a brood in water can provide some pleasing reflections of the duck and her ducklings when still water becomes a mirror. At the same time, the reflections of vegetation in the background or foreground can be distracting or even ruin a photo. In that case, perhaps the brood will move into a better position; wait it out and see what happens.
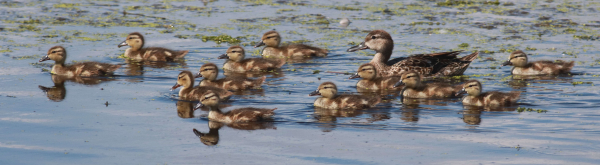
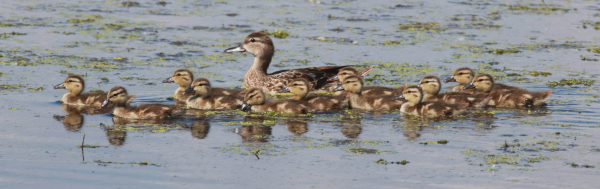
Get Low Sometimes – Compare the first photo illustrating this article with the second photo to see how standing above the Blue-winged Teal in the first photo compares with getting down to the ducklings’ level. The second photo may not necessarily be better, but it does provide a different vantage point and it may provide some improved images in some cases. The third photo in this article is an even better example of an image that provides a low profile of Ruddy Ducks that depicts a tranquil moment with a hen and her brood.
Zoom – A zoom lens can be a real aid in photographing duck broods. These versatile lenses allow you to zoom in and out to get tighter or more wide-angle views of broods. We usually like to get all the brood within a given frame, but you can always take a wide-angle photo that includes all the ducklings in a brood of 10 for example, then zoom in to get a closer view of 6 of the ducklings in closer context with the female. After all, some broods have 10 ducklings, some broods have 6. The point is, you can crop your photos “in camera” using a zoom lens.
Bracket & Edit – When you have a brood before you, while photographing be sure to take as many photos as possible. Too often we take 2 or 4 photos thinking that might be overkill, but later during editing we may find that we should have taken more. Ducklings tend to turn their heads and change directions quickly and with several ducklings moving at the same time, it’s nice to have ample photos from which to choose the best of the series. When photographing, try to be aware of the first couple ducklings in the group, especially the lead. When editing photos, check the positioning of the front ducklings, and be aware of the last duckling’s position, and those nearest the female. Ultimately, you want the hen to be the center of attention – where your eye goes first – but the ducklings’ faces and positions should be attractive too.
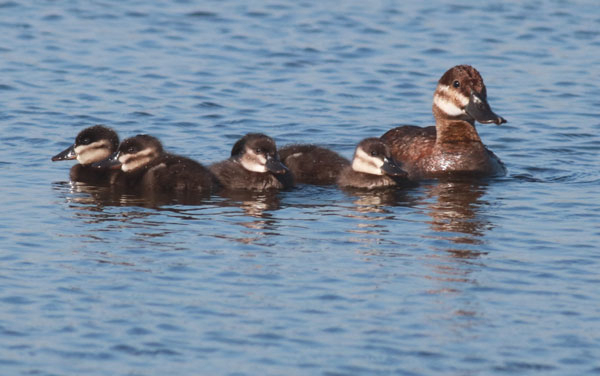
This photo gives you the perspective of being part of the group as you view the tranquil brood of Ruddy Ducks with the attentive hen in beautifully colored water. The photo was cropped to include a larger area of water in the foreground, which emphasizes the impression the photo was taken from water level.
|
Crop – Duck broods tend to provide horizontal images of a hen in the front, back, or middle of a number of downy ducklings in a line or circle round the female. This creates a lot of extra space on the top and bottom of the photo, which you can crop out of the image using your photo editing software. The photos illustrating this article have all been cropped in this way, which improved the images overall and focused the attention on the birds. The amount of background you crop from any photo is, of course, your personal preference and ill probably vary from photo to photo.
Aperture-preference Settings
As I’ve described before, I never use an automatic setting, or a totally manual one. Instead, I use the Av setting, which allows you to set a given aperture setting, say f8, and the camera will automatically adjust your shutter speed, depending on the amount of light available. If the shutter speed is automatically set too slow, say 1/200 second, just turn your aperture dial to f6 and you may get a shutter speed of 1/500 of a second. If the shutter speed rates at 1/1000 you may wish to increase the field of focus by turning the aperture to f10 – you get the idea.
Prime Photo Periods – Of course, balancing the aperture and shutter speed will depend on the amount of available light. I suggest trying to limit your photography periods to the early morning and late afternoon-evening period at this time of the year. These days, mornings provide the best light between 7:00 and 10:00am. In my area, the sun doesn’t set until 9:30pm, and I find the best light is from 6:00 to 8:00pm. Those times will change as the longest days of the year (now) fade to shorter daylight periods with the sun ever farther south in our sky. Be aware of these changes and adjust your best photo periods accordingly. The morning and evening photo periods also tend have less wind, which is more conducive for ducklings to be more active in open water areas.
Duck Hotspots
Any location where you find one duck brood is worth re-visiting. If you have a second interaction with that brood there will undoubtedly be different conditions of light and location. Also, the ducklings will constantly be growing and maturing, providing different looks of different age groups using the same brood. Then too, a location that is good for one brood, will usually be the destination for other hens with broods as more clutches hatch.

The calm open water provided a pleasing image of this foraging Gadwall brood that shows contrast between the background and the ducks. Compare this photo with the brood photo in the Editor Afield article in this issue, in which the setting offered only a dark-green background of reflected vegetation in which details of the birds are not accented.
|
One pond filled with the high-protein tiny aquatic crustaceans and insect larvae favored by ducks and ducklings may fill with a half-dozen or more broods made up of a few different species. For instance, last week I photographed some broods in a location where I saw 11 different broods, including Blue-winged Teal, Mallards, and Northern Shovelers within an area about 250 feet long and about 30 feet wide – hard to believe, but it provided a lot of fun and photos for this photographer!
If you haven’t already been photographing ducks recently, I hope you have a chance to enjoy some photo opportunities with broods of cute downy little ducklings. There are certainly a variety of ducks to be found across North America, and it’s fun to see how many species you can photograph each season. It’s even worth a birding trip or two to visit a different habitat with the intent of photographing different species – say mountain streams or northern coastal rivers for Harlequin Ducks, or a steamy backwater marsh to photograph Black-bellied Whistling Ducks or Masked Ducks. Each species offers its own rewards and inherent number of smiles, and even a city Mallard brood at a local park will provide a lot of fun and some important practice. Enjoy the season!
Article and photographs by Paul Konrad
Share your bird photographs and birding experiences at editorstbw2@gmail.com