
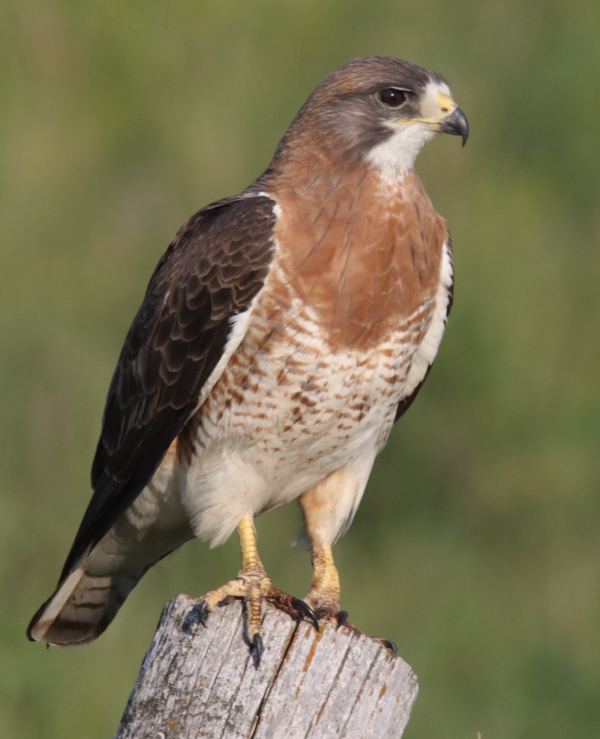
Truly one of the most elegant Swainson’s Hawks that Paul has photographed over the years, the background was blurred out of focus by using an f-6 aperture, which helped to emphasize the raptor by minimizing its surroundings (photo tech: 600mm zoom lens, f-6 aperture, 1/1250 shutter speed, ISO 400).
|
Mid-July provides an exciting diversity of birds in a variety of habitats encountered under varied lighting and weather conditions. That means you need to be prepared by pre-setting your camera and lens for the likely next photo scenario, while being ready to make quick changes to the most obvious camera settings – those related to the lighting conditions, the ISO, aperture, and shutter speed.
For a moment before we address the tech settings, let me emphasize that in order to take quality photos of birds, you need good sunlight. For optimum lighting, I make every effort to position myself between the sun and the bird, with my shadow pointing at my subject. That’s right, when photographing I am always double-checking the shadows of trees and poles so I’m aware in advance of the direction of where the light is coming from, and when walking I periodically check my shadow to ascertain the direction of the sunlight and position myself accordingly – between the sun and the bird(s).
That brings up the most important aspect of bird photography – you need sunlight to create the best quality photographs of birds. If it is overcast, I find something else to do, because I know that any photos I take will not have basic quality of colors, contrast, or clarity. Photos taken during cloudy weather tend to be dull with muted colors.
At the same time, bright sunlight from overhead will create harsh shadows. The best time to photograph is when the sun is at a 30- to 60-degree angle above the ground – during morning an hour after sunrise, and again during late afternoon until an hour before sunset. This practice will provide more direct lighting for bird photography while eliminating most shadows. Now on to the camera settings initially mentioned – the ISO, aperture, and shutter speed.
Simple Camera Settings
While all cameras have automatic settings, no camera can think better than you can, so instead, use some simple tech settings to get the most out of your bird photos. With decades of experience to share, I believe it’s best to set the Mode Dial to Av (aperture priority); then set your aperture (f-stop) and the camera will automatically provide the associated shutter speed as determined by the amount of available light.
If you want to prioritize a fast shutter speed, that’s easy; just set your aperture to an f-5 or f-4, and you will get the fastest shutter speed the associated light will provide. (Most telephoto lenses don’t have apertures beyond f-4 or f-5.) So using the Av setting is almost automatic, but you are in charge of the aperture, which provides a wide or narrow area in focus; and it also keeps you in charge of the shutter speed. Aperture and shutter speed are always interconnected; when you change one, the other will change too, even under manual settings. So if you change the aperture to f-8, your shutter speed will be somewhat slower than at f-5 – it’s easy to get familiar with those simple interconnected changes.
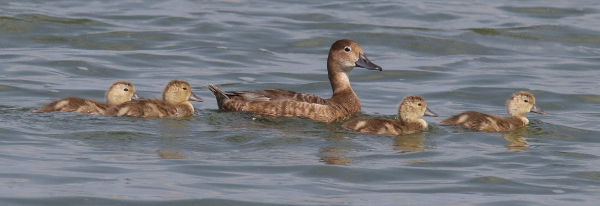
When photographing duck broods, I find it’s important to keep as wide an area in focus as possible to keep all the scattered ducklings focus in your photos. That’s when I try to use at least an f-8, or better yet an f-10. But Saturday, when I photographed an impressive Swainson’s Hawk perched before a busy grassland background, I wanted to blur the background out of focus, to emphasize the colorful hawk and remove the distracting vegetation in the background. This was accomplished by setting my aperture to a narrow f-5, which kept the hawk in sharp focus while blurring the background a fairly uniform green. This technique works best if there is ample space between the bird and the background elements, but it really helps to pop the bird out of a busy landscape.
As you know, you don’t always have time to make changes to your camera settings. Suddenly, there’s a bird! So take initial photos, then make changes in your settings as you see fit if the bird remains. But have your camera preset so you are ready to take a photo at a moment’s notice. During sunny days, I preset the ISO to 400, use an aperture of f-8; and the resulting shutter speed will usually be between 1/1200 to 1/2000 – fast enough to stop most motion. Then, when I’m in position to photograph and the bird or birds permit an extra moment, I can double-check the settings and adjust any to try to improve settings, and ultimately the resulting images.

Personally, I find the 400 ISO setting to be the best under good sunlight conditions. I tend not to photograph during low light periods, but if the sun goes behind a maverick cloud, I increase the ISO to 800 if the shutter speed is reduced significantly by the shaded sunlight. I find that any setting above ISO 800 tends to produce grainy photos, so almost always limit myself to 400 or 800. Using an ISO of 200 or 100 provides better quality images, but these settings tend to limit your shutter speed and/or aperture a bit, so ISO 400 seems to be the best bet for me for bird photography with the sun at my back.
I use the Al-Servo setting on my camera so I can take a continuous series of photos. It’s possible to take a single photo when using this setting, but you can also take 2 or 3 photos at a time if you hold the shutter button down a moment longer. And when a bird is especially active, such as when it’s flying or displaying, you can hold the shutter release button down for the camera to take a continuous series of images at a rate of 3 to 10 photos or more per second, depending on your camera model. Using the Al-Servo setting, I tend to take 2 photos at a time, which provides a second image as a bird turns its head, or it usually shows a second wing position if a bird is flying.
Composition
As you look through the viewfinder of your camera, be aware of the background in the photo frame. Try to position your lens to keep distracting twigs or grass out of view, which may simply be a matter of moving your camera a bit to the right or left, or taking a step right or left to get a clearer background that is less distracting.
However, in some cases a twig with leaves or other vegetation can add a natural element to a bird photograph. Plants and other natural elements are often a welcome background for bird photos, and when that’s the case you may wish to increase the area in focus around the bird by dialing the aperture to f10 or so, as long as you have plenty of shutter speed to work with – say above 1/400 for a motionless bird.
In the moment, try to be aware of shadows on the bird you are photographing, caused by adjacent vegetation, the overhead angle of the sun, or when you’re not in the best position with respect to the direction of the sunlight. In the field you often don’t notice a shadow, but because shadows are more obvious in photos (darker), it’s good to watch specifically for shadows and adjust your position to avoid them when possible.
Approaching & Positioning
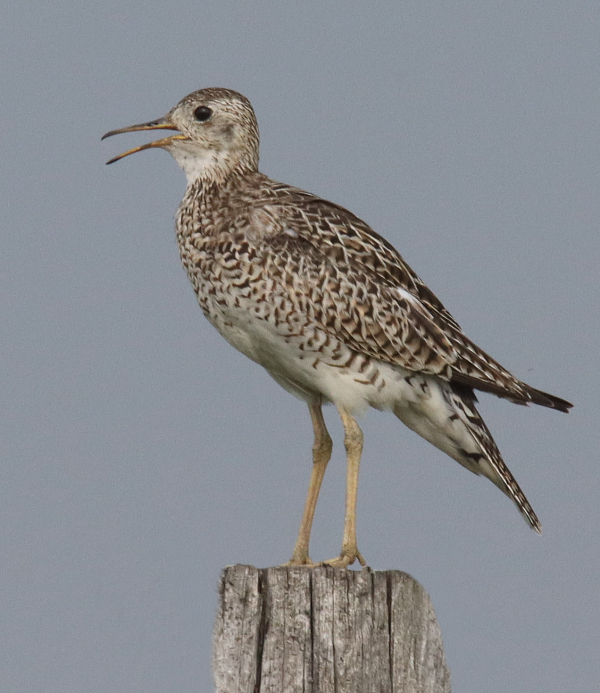
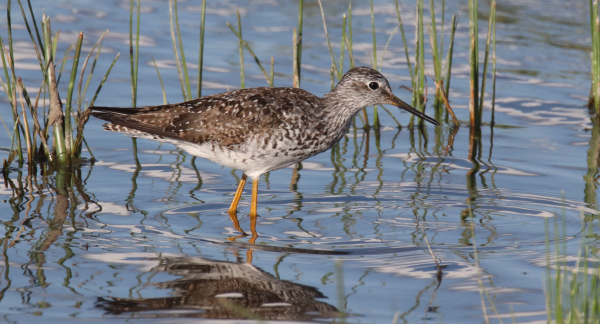
The ISO was previously changed from 400 to 800 to ensure brighter photos as a raincloud passed, but as the sun broke through the resulting readings seemed fine while focusing on the Upland Sandpiper. Obviously at ease with the appearance of the mobile blind, the prairie sandpiper added its territorial call to the rain-freshened air. Enjoy your summer photo sessions (photo tech: 600mm zoom, f-8 aperture, 1/1250 shutter speed, ISO 800).
|
When photographing birds, keep their best interests foremost in mind. Try not to get too close; allow them to behave naturally. When they become alert, stop. In fact, sometimes when you stop short of making birds fly, they may actually move closer in your direction if you let them get familiar with you. If you try to approach a distant bird, keep a low profile, move slowly, and don’t walk directly at the bird; move at an angle to the bird that gets you ever closer while keeping the sun at your back and try not to look at the bird when that’s possible. I find that approach works better than walking directly at the bird with your eyes intent on it.
I took all the photographs that illustrate this article last week from inside my car, which I refer to as my mobile blind. Birds tend to react to people, but mostly ignore a parked vehicle. Turn off your vehicle any time you are photographing to keep your camera as stable as possible, then lean the lens on top of a slightly raised window or against the side of the window frame to reduce body shake that may be transferred as you hold your camera. Likewise, hold your breath any time you press the shutter button to reduce any bodily vibrations, and press the shutter button lightly to avoid a jerking motion.
As summer progresses, enjoy the birds around you and enjoy photographing when conditions are right. One more thought: Anticipate the next move of the birds you are photographing, and be prepared to react to what might be fast action. That suggestion and the others provided herein should be helpful as you photograph the variety of birds that fill your days of summer – Good Luck!
Article and photographs by Paul Konrad
Share your bird photos and birding experiences at editorstbw2@gmail.com