
It's an exciting time of the year, with new birds arriving at favorite local birding hotspots as well as in your yard and at your feeders. Are your bird photography skills amped. Are you planning any photo trips? Day trips, an overnighter, or an extended fall migration trip? Maybe a winter getaway to an exciting birding location? It’s been such a successful year for me personally that I’m trying not to miss anything day to day, and I hope you have had great luck with your camera too.
Most weeks I provide bird photography insights within an article that provides context for the photographs I manage to take on a regular basis, given my drive to photograph birds and the fact that I live in a very bird-rich area. But with a variety of bird photography opportunities ahead, this week I’d like to provide my photo insights in a concise, fairly organized list of tips and techniques by revisiting what I consider to be my best description of the basics of bird photography.
When I bought my first used camera and 200mm zoom lens, I certainly wish someone had offered this photography list to me; then, or at any time since then it sure would have come ni handy and made me a better photographer much quicker. So I want to share my best bird photography resource, a list I’ve created using my years of experience mixed with tips shared with me over the years by professional and hobbyist friends, and other techniques gleaned by reading extensively. I hope this information will give you a great introduction or a helpful review of all the things you can do to improve your chances of getting more quality bird photos – now and for years to come.
Not every tip listed below will be useful for every photographer, but anyone will be able to glean some valuable pointers, and I hope this collection of photo methods also offers a bit of inspiration and enthusiasm for you to search for your next photo opportunities more often. Many of these methods become second nature with time, like making sure the sun is behind you as you focus your lens on birds; checking to see where your shadow is pointing periodically, and holding your breath when you press your camera’s shutter button.
This is the kind of article that offers such a variety and thorough collection of helpful tips that I encourage you to print it out and post a copy on your bulletin board, and fold another copy to make it easier to keep it to your camera backpack, glove compartment, or your back pocket; and share it with other bird photographers too. This list will truly help make you a better bird photographer, and I hope it adds a new level of enthusiasm for you with renewed and improved production from your camera and lens.
Paul’s Complete List of Bird Photography Tips
– I keep my camera within reach at all times. I never want to say: “I wish I had my camera!”
– Quality photos require good sunlight. For optimum lighting, I make every effort to position myself between the sun and the bird, with my shadow pointing at my subject.
– The best time to photograph during any given sunny day is when the sun is at a 30- to 60-degree angle above the ground – starting an hour after sunrise, and again during late afternoon until an hour before sunset. This practice will provide more direct lighting for bird photography while eliminating most shadows. Avoid photographing during midday when the sun is overhead or mostly overhead as that’s when the effect of shadowing on the bird and in the scene is greatest.
– Be aware of shadows on the bird you are photographing, which may be caused by the overhead angle of the sun or when you’re not in the best position with respect to the direction of the sunlight. In the field you often don’t notice a shadow, but because shadows are more pronounced in photographs, it’s good to watch specifically for shadows and adjust your position to avoid them when possible.
– Check your own shadow periodically; try to keep your shadow pointing at the bird or birds you are photographing as this shows you are in the best position for optimum lighting, and the you are less apt to have shadows affecting the birds.
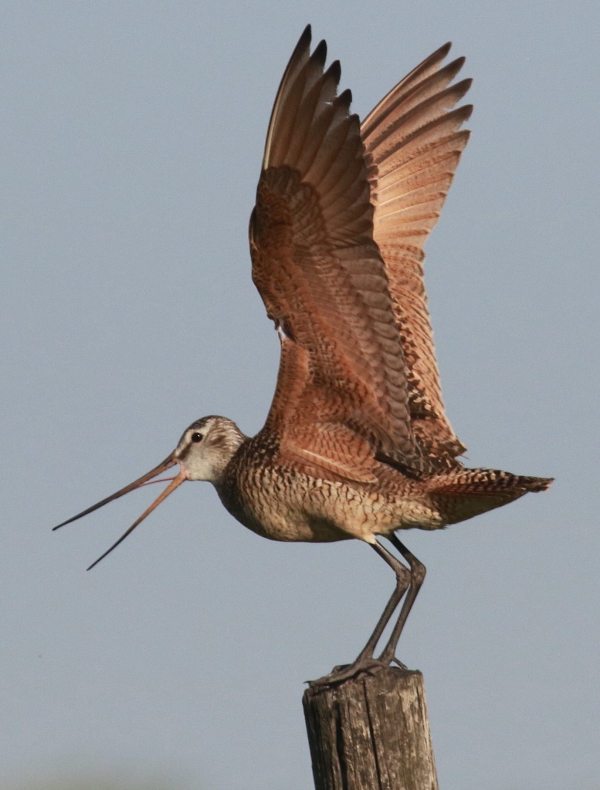
You can almost hear the sharp calls of the Marbled Godwit as it landed at the end of a territorial flight. Watch for chances to take action photos and keep in mind that shorebirds often hold their wings spread above their back for a moment after they land (400mm telephoto lens, f-7 aperture, 1/2500 shutter speed, ISO 400).
|
– Keep in mind that when birding and especially when photographing birds, the welfare of the birds should be paramount. It’s always most rewarding if you can photograph birds without displacing them, and you definitely want to avoid disturbing them if they are nesting, hunting, or feeding. I always like to live by the motto, “the birds’ welfare comes first.” At the same time, there are always hyper-wary birds that will react to any outside activity, and birds are constantly on the move, so don’t over-react if a bird flies from a perch while photographing; often they just move to the next perch.
– Try not to get too close to birds; allow them to behave naturally. When you stop short of making birds fly, they may actually move closer in your direction. Give birds time to adjust to seeing you.
– If you try to approach a bird, keep a low profile, move slowly, and don’t walk directly toward the bird; move at an angle to the bird that gets you ever closer. If necessary, walk slowly in a long zig-zagging fashion as you move closer, while keeping the sun at your back.
– Anticipate the next move of the birds you are photographing, and be prepared to react to that fast action.
– Focus on one eye of the bird to be sure your focal point is centered on the bird. If the bird’s eye is not in focus, your photograph will suffer overall.
– Hold your breath any time you press the shutter button to help eliminate body motion.
– Lightly squeeze your finger down on the shutter release button to reduce any jerky motion on the camera as you take photos.
– When photographing birds, stabilize your camera and lens as best you can to reduce body shake that can be transferred as you hold your camera. Body shake includes your beating heart, other natural internal movements, and breathing.
– To brace your camera, lean your lens against a tree, post, window frame, or another stable option. When photographing in the open, you can brace your elbows against your chest or sides to provide more stability as you handhold your camera and lens (rather than holding your elbows out to the sides).
– Some birders use a tripod to help stabilize their camera and lens, but for many of us using a tripod is cumbersome at best, especially when photographing flying birds. Dealing with a tripod, frankly, takes much the fun out of bird photography. If you use a tripod, select one with thick strong lower legs to make sure the tripod is as stable as possible. When you use a tripod, you should also use a shutter release cable, and that’s no fun either.
Simple Camera Tech
– Please don’t use the automatic setting on your camera. Instead, it’s best to set the Mode Dial to Av (aperture priority); then set your aperture (f-stop) and the camera will automatically provide the associated shutter speed as determined by the amount of available light. Watch how your shutter speed changes as you change the aperture setting, in case you wish to use a faster shutter speed.
– Preset your camera so you are ready to take a photo at a moment’s notice, which happens fairly often when photographing birds. During sunny days, I preset the ISO to 400, use an aperture of f8, and the resulting shutter speed will usually be between 1/1200 to 1/2000 – fast enough to stop most motion. Then, when I’m in position to photograph and have an extra moment, I double-check the settings and adjust any if needed. I also adjust settings if a change in the sunlight level or weather indicates a need for change.
– Personally, I find the 400 ISO setting to be the best under good sunlight conditions. I tend not to photograph during low light periods, but if the sun goes behind a cloud, I increase the ISO to 800 if the shutter speed is reduced significantly by the shaded sunlight. I find that any setting above ISO 800 tends to produce grainy photos. Using an ISO of 200 or 100 provides better quality images, but these settings tend to limit your shutter speed and/or aperture a bit, so ISO 400 seems to be the best bet for me for bird photography with the sun at my back.
– I keep my camera’s Al-Servo set so I can take a continuous series of photos. Using this setting, it’s possible to take a single photo, but you can also take 2 or 3 at a time if you hold the shutter button down a moment longer. And when a bird is especially active, such as when it’s flying or displaying, you can hold the shutter release button down for the camera to take a continuous series of images at a rate of 3 to 10 photos or more per second, depending on the camera model you use.
– Using the Al-Servo setting, I tend to take 2 photos at a time, which provides a second image that usually shows a wing position change during flight, or provides 2 images as a bird turns its head.
Composing Your Photos
– Try not to center a bird in the middle of the photo; leave a little more space in front of the bird for it to look into, walk into, swim into, or fly into. It tends to create a more pleasing composition.
– To better understand how to position a bird within your photo frame, I suggest taking a quick look at the “rule of thirds,” which artists often use when composing their artwork. Photographers also use this technique for photo framing and design, although it’s just a guide to be aware of when composing photos. Ultimately, do what looks best to you.
– Using a zoom lens can be helpful when positioning a bird in the photo frame, zooming in and out to include more or less background. But you can also reframe a photo and thereby reposition the bird in the frame by cropping it using photo editing software. By simply cropping extraneous sky, water, or plants surrounding the bird you can position the bird off-center, up or down as you wish by cropping the original photo – and you will enlarge the bird’s size in the photo in the process.
– Keep aware of the background as you are composing photos. Try to eliminate distracting twigs and grass from view, which may simply be a matter of moving your camera to the right or left, up or down; or taking a step left or right to get a clearer background that is less distracting. However, in some cases a twig with budding leaves or other vegetation can add a natural element to bird photographs.
– Getting a more uniform background can be accomplished with some success by reducing the area in focus (depth of field) to throw the background out of focus. This blurred background effect helps to emphasize your subject, and is accomplished by setting your aperture to a narrow f4 or f5. That aperture should keep your bird in focus while blurring the background, although this technique works best if there is ample space between the bird and the background elements.
– Using a narrow f4 or f5 aperture also provides a faster corresponding shutter speed, which is helpful in stopping any motion and creating sharp images.
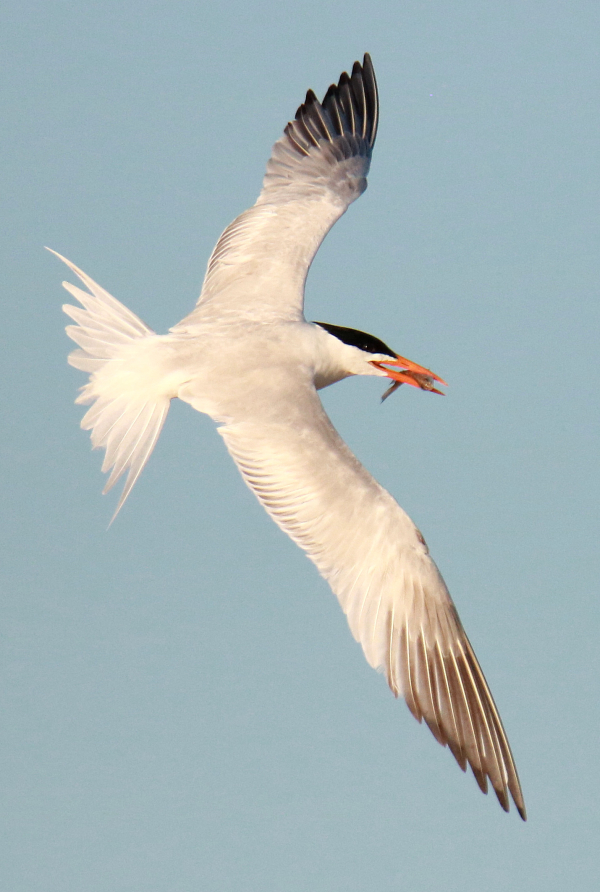
As the daylight was fading, Paul adjusted his ISO from 400 to 800 as he photographed terns on the wing. But with ample light exposure, this Regal Tern’s action was stopped with a 1/4000 shutter speed while it banked into an onshore wind after catching a small fish (600mm zoom lens, f-6 aperture, 1/4000 shutter speed, ISO 800).
|
– Plants and other natural elements are often a welcome background for bird photos. When that’s the case, you may wish to increase the area in focus around the bird by dialing the aperture to f11 or f14, as long as you have plenty of shutter speed to work with – say above 1/400 for a motionless bird, and 1/1000 or faster for birds in flight.
– While watching the area behind the bird for any distracting elements or unnatural colors, watch for distracting shadows on the bird or around it as you get into position. Reposition as needed to avoid shadows and other distracting elements.
– When photographing birds positioned on the ground, as they swim in water, or wade along a shoreline, try photographing from your knees, in a sitting position, or even a prone position to get closer to the birds’ eye level. Try photographing from a ‘birds eye view’ at times.
Mobile Photo Blind Options
– I like to use my vehicle as a comfortable mobile blind. Birds tend to react to people, but mostly ignore a parked vehicle. I have a few birding hotspots where I can park next to flowering trees, a wetland shoreline, or prominent perches where birds create fine photo opportunities.
– Your vehicle provides the option to reposition a few feet forward or backward when needed, or to drive onward to look for the next photo opportunity.
– Turn off your vehicle’s engine any time you are photographing to minimize vibrations so you can keep your camera and lens as stable as possible.
– Also, stabilize your lens by holding it on the top of a slightly raised window or against the side or top of the window frame to reduce body shake that may be transferred as you hold your camera.
– Hold your breath any time you press the shutter button to reduce any bodily vibrations, and press the shutter button lightly to avoid a jerking motion.
– Stay inside your vehicle and reduce any motions to make birds less wary. While birds often accept a parked vehicle, that changes if you open a door or get outside. (If you do need to step outside to photograph, don’t slam the door.)
– Using your vehicle, explore a more expansive area occasionally to monitor where the birds are, and where they aren’t. Take advantage of photo opportunities you encounter along the way, and at the same time, plan for future photo opportunities with respect to the time of day the sun will best illuminate a promising area.
– If you see a promising photo op as you are driving, be especially aware of any vehicles driving behind you, and keep safety your first priority. You may need to drive by a bird, find a safe place to pull over, then return to the bird’s location to try for a photo op. Pull safely off the side of the road in the best possible position to photograph your subject with respect to the direction of the sunlight, but always keep vehicle safety a priority.
Photo Editing – Composition, Design, & Filing
– When using photo editing software, I alter the photo as little as possible; but simple cropping of an image can improve a photo immensely, and it can increase the size of the bird(s) within a photo frame by cutting out extraneous parts of the background – effectively zooming in on the bird.
– Try to keep up with your photo review and editing process, which is usually best performed as soon as possible after each photo session. Keep your photo files orderly, organized, and easy to access.
– Use a uniform naming system – perhaps one that identifies a bird in a photograph by their family group – species, sex, age, and the activity the bird is engaged in (flying, perched, swimming, etc), along with the month and year it was taken. An example of my naming system is: Raptors – Bald Eagle adult perched on boulder 10-23.
– To create photo files, I separate all photos I keep into individual files, seasonal files, and annual files. I download individual files about every 2 weeks (twice per month) in a quarterly seasonal file (winter, spring, summer, fall), which is contained in an annual file. Any photos I pick out of a file to edit, I copy into a ‘best of year’ file for easier access. This method works well for me and keeps my photos fairly organized and readily retrievable when I wish to review them or publish them.
– Keep at least 2 copies of all your photos, and keep them in different locations to ensure you never “lose” any of your valuable photos due to damage by fire, flood, or theft. It’s easiest to keep your photo files on external hard drives, separate from your computer, although it’s always convenient to have a file of favorite photographs saved on your computer for easy access.
– Enjoy sharing your bird photographs. Attach a photo or 2 to your emails, texts, and by all means share them on social media applications. Bird photos are interesting and inspiring; they may open a line of conversation, or lead to learning more about the species. You may even be surprised (and gratified) when people start introducing you as a photographer.
– Photographing birds is usually not easy, and in addition to all the other things that contribute to getting quality photos of birds, there is always a definite Luck factor – Good Luck!
A variety of tips and techniques are provided each week in the Bird Photography features, usually mixed into narratives describing photo opportunities, but here you have an easy to refer to reference list – the best I can offer to anyone interested in photographing birds – whether you are a beginner or a seasoned pro. Have a lot of fun, get excited, display your favorite photos, and share your photos with others – it’s all part of the joy of photographing birds.
Article and photographs by Paul Konrad
Share your bird photos and birding experiences at editorstbw2@gmail.com