Fall brings new birds into the areas surrounding us, to favorite birding locations, area refuges, and into our yards – and every bird provides potential for us to photograph them in a variety of ways. I like to emphasize photographing birds that create excitement in me, that get some adrenaline pumping, command my eyes to watch their every move and zero in on them with my camera. Geese, cranes, and swans; hawks, falcons, and eagles – the big birds with big behaviors fire me up, and often they are social species that create flocks that provide interesting opportunities to photograph them in flight as they move from resting areas to feeding areas.
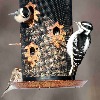
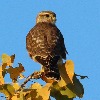
Smaller birds are just as likely to get my juices flowing, especially when birds that I don’t get to see other times of the year suddenly appear from the north. Harris’s Sparrows are great favorites, along with Fox Sparrows and American Tree Sparrows; any warblers and thrushes, plus colorful jays and dynamic woodpeckers – especially if I can work some fall colors into photos. Later in the season, Snow Buntings and owls will demand attention – Short-eared Owls, Great Horned Owls, and Snowy Owls – along with Rough-legged Hawks and Golden Eagles. But you have your own local favorites, and certain birds you would like to photograph someday. Watch for your birds of interest in the field and anywhere you go – the key is to have your camera ready and within reach.
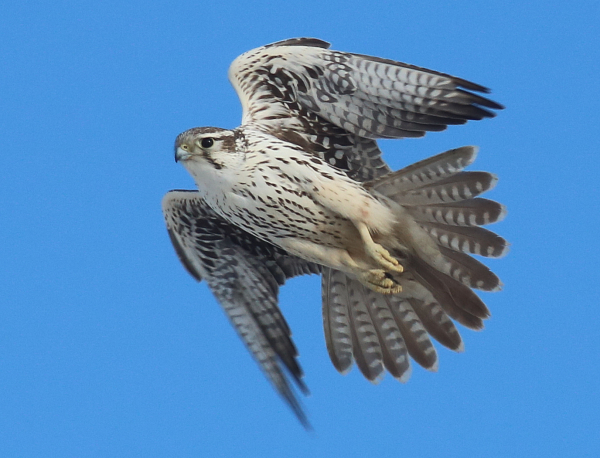
Action photos of birds are most exciting, and flight photos are favorites among bird photographers. The lighting, blue sky background, and sharp eye, face, and plumage features surrounded by the spread tail and pointed wings combine to make this flight photo of a Prairie Falcon a standout.
With exciting fall bird photography opportunities ahead, I thought it would be a good plan to share a full list of what I consider to be the basics of bird photography. Each birder will have their own take on what works best for them, what they prefer in specific birding hotspots and secret migration haunts. Even so, permit me to offer a bit of inspiration, and some insights from the following list of bird photography tips that photographers have passed on to me and that I’ve learned from years of experience. Frankly, I wish someone had offered such a list to me when I bought my first used 35mm camera and 200mm zoom lens.
Many of these methods become second nature with time, like holding your breath when you press the shutter button. This is the kind of article that offers such a variety of helpful tips that I encourage you to print it out and post a copy on your bulletin board, and add one to your camera backpack, glove compartment, or your back pocket. This list will truly help make you a better bird photographer:
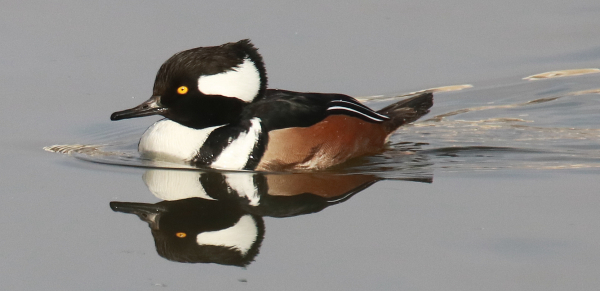
Ducks like this male Hooded Merganser offer a variety of photo opportunities throughout the fall season. Try photographing from your knees or from a sitting position occasionally to get closer to the birds’ level when photographing birds swimming in water, wading along a shoreline, or standing on the ground.
– Quality photos require good sunlight. For optimum lighting, I make every effort to position myself between the sun and the bird, with my shadow pointing at my subject.
– The best time to photograph is when the sun is at a 30- to 60-degree angle above the ground – during morning an hour after sunrise, and again during late afternoon until an hour before sunset. This practice will provide more direct lighting for bird photography and eliminate most shadows. Avoid photographing during midday when the sun is overhead or mostly overhead.
– Be aware of shadows on the bird you are photographing, caused by the angle of the sun or when you’re not in the best position. Often, in the field you don’t notice a shadow, but because shadows are more obvious in photos, it’s good to watch specifically for shadows and adjust your position to avoid them when possible.
– If you try to approach a bird, keep a low profile, move slowly, and don’t walk directly at the bird; move at an angle to the bird that gets you ever closer, slowly zig-zagging if necessary, while keeping the sun at your back.
– Try not to get tooo close to birds; allow them to behave naturally. When you stop short of making birds fly, they may actually move closer in your direction.
– Anticipate the next move of the birds you are photographing, and be prepared to react to that fast action.
– Focus on one eye of the bird to be sure your focal point is in the middle of the bird. If the bird’s eye is not in focus, your photograph will suffer overall.
– Hold your breath any time you press the shutter button to help eliminate body motion.
– When photographing birds, stabilize your camera and lens as best you can to reduce any body shake that could be transferred as you hold your camera. (Body shake includes your beating heart and natural internal movements.)
– To brace your camera, lean your lens against a tree, window frame, building, or another stable option. When photographing in the open, you can brace your elbows against your chest or sides as you handhold your camera and lens.
– Lightly squeeze your finger down on the shutter release button to reduce any jerky motion on the camera as you take photos.
– Some birders use a tripod to help stabilize their camera and lens, but for many of us using a tripod is cumbersome at best, especially when photographing flying birds. Dealing with a tripod, frankly, takes much the fun out of bird photography. If you use a tripod, select one with thick strong lower legs, and you should also use a shutter release cable – that’s no fun either.
– I keep my camera within reach at all times. I never want to say: “I wish I had my camera!”
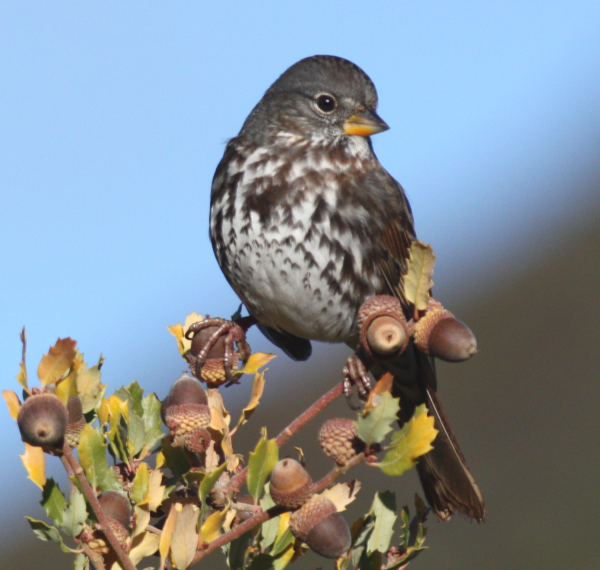
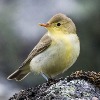
This photo of a Fox Sparrow perched atop the acorns and leaves of a scrub oak shows how using an f5 aperture provided a narrow area of focus that blurred the background vegetation out of focus, which emphasizes the striking bird and the pleasing branch it perched on.
Tech Basics
– Please don’t use the automatic setting on your camera. Instead, it’s best to set the Mode Dial to the Av preference; then set your aperture (f-stop) and the camera will automatically provide the associated shutter speed as determined by the amount of available light.
– I preset my camera so I’m ready to take a photo at a moment’s notice, which happens fairly often when photographing birds. When I’m in position to photograph and have an extra moment, I double-check the settings and adjust any if needed. During sunny days, I preset the ISO to 400, use an aperture of f8; and the resulting shutter speed will usually be between 1/1200 to 1/2000 – fast enough to stop most motion.
– Personally, I find the 400 ISO setting to be the best under good sunlight conditions. I tend not to photograph during low light periods, but if the sun goes behind a cloud, I increase the ISO to 800 if the shutter speed is reduced significantly by the shaded sunlight. I find that any setting above ISO 800 tends to produce grainy photos. Using an ISO of 200 or 100 provides better quality images, but these settings tend to limit your shutter speed and/or aperture a bit, so ISO 400 seems to be the best bet for me for bird photography with the sun at my back.
– I keep my camera’s Al-Servo set so I can take a continuous series of photos. Using this setting, you can take a single photo, but you can also take 2 or 3 at a time if you hold the shutter button down a moment longer. And when a bird is especially active, such as when it’s flying, you can hold the shutter release button down for the camera to take a continuous series of images at a rate of 3 to 10 photos or more per second, depending on the camera model you use.
– Using the Al-Servo setting, I tend to take 2 photos at a time, which provides a second image that usually shows a wing position change during flight, or provides 2 images as a bird turns its head.

Taken from a low position, the thin layer of water covering the coastal sand provided a pleasing background that emphasizes the plumage and body details of foraging Sanderlings. The lack of shadows points to the sunlight beaming from behind at a 30- to 60-degree angle above the horizon.
Photo Composition
– Try not to center a bird in the middle of the photo; leave a little more space in front of the bird for it to ‘look into, walk into, or fly into.’
– To better understand how to position a bird within your photo frame, I suggest taking a quick look at the “rule of thirds,” which artists often use when composing their artwork. Photographers also use this technique for photo framing and design, although it’s just a guide to be aware of when composing photos. Ultimately, do what looks best to you beyond centering a bird in the frame.
– Using a zoom lens can be helpful when positioning a bird in the photo frame while initially taking a photograph. But you can also always reframe the photo and thereby reposition the bird in the frame by simply cropping the image using photo editing software.
– Keep aware of the background of your photo. Try to eliminate distracting twigs and grass from view, which may simply be a matter of moving your camera to the right or left, or taking a step right or left in some cases to get a clearer background that will be less distracting. However, in some cases a twig with budding leaves or other vegetation can add a natural element to a bird photograph.
– Getting a more uniform background can be accomplished with some success by reducing the area in focus (depth of field) to throw the background out of focus. This blurred effect helps to emphasize your subject, and is accomplished by setting your aperture to a narrow f4 or f6. That aperture should keep your bird in focus while blurring the background, although this technique works best if there is ample space between the bird and the background elements.
– Using a narrow f4 or f6 aperture also provides a faster corresponding shutter speed, which is helpful in stopping the motion of fast-moving songbirds and creating sharp images.
– It’s fine to have plants and other natural elements show in the background, and in some cases you will want to embrace the background. Then, you may wish to increase the area in focus around the bird by dialing the aperture to f11 or f14, as long as you have plenty of shutter speed to work with – say above 1/400 for a motionless bird, and 1/1000 or faster for birds in flight.
– Watch for distracting shadows on the bird or around it as you get into position, while watching the area behind the bird for any distracting elements or unnatural colors. Reposition to avoid shadows and other distracting elements.
– When photographing birds on the ground, swimming in water, or wading along a shoreline, try photographing from your knees or in a sitting position occasionally to get closer to the birds’ level.
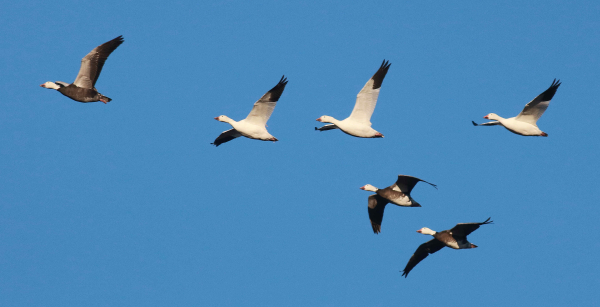
As fall progresses, migrating flocks of geese, cranes, sandpipers, and others provide the opportunity to photograph concentrations of birds. To photograph Snow Geese and other flocks of birds in flight, it’s fun to find a location where flocks are flying from resting areas to feeding sites.
Using a Mobile Photo Blind
– I like to use my vehicle as a comfortable mobile blind. Birds tend to react to people, but mostly ignore a parked vehicle. Pull safely off the side of the road in the best possible position to photograph your subject with respect to the direction of the sunlight.
– Your vehicle provides the option to reposition a few feet forward or backward when needed, or to drive onward to look for the next photo opportunity.
– Turn off your vehicle any time you are photographing to keep your camera lens as stable as possible.
– Stabilize your lens on the top of a slightly raised window or the side of the window frame to reduce any body shake that may be transferred as you hold your camera. Also, hold your breath any time you press the shutter button.
– Stay inside your vehicle and reduce any motions to make birds less wary. While birds often accept a parked vehicle, that changes if you open a door and get outside. (If you do need to step outside to photograph, don’t slam the door.)
– Using your vehicle, explore a more expansive area occasionally to monitor where the birds are, and where they aren’t. Take advantage of photo opportunities you encounter along the way, and at the same time, plan for future photo opportunities with respect to the time of day the sun will illuminate a promising area best.
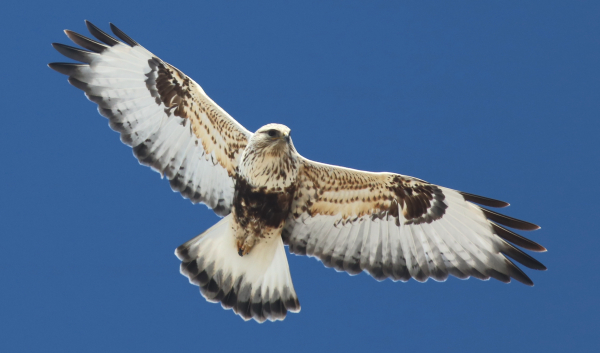
Late fall may reveal photo subjects like this Rough-legged Hawk that can be found hovering while hunting, perched, or in this case soaring overhead to provide a dramatic view of an impressive bird. Search out the birds of fall, camera in hand, and good luck!
Post-Photography Design
– When using photo editing software, I alter the photo as little as possible; but simple cropping of an image can improve a photo immensely, and it can increase the size of the bird(s) in a photo frame by cutting out extraneous parts of the background – effectively zooming in on the bird.
– Try to keep up with your photo review and editing process, which is usually best performed as soon as possible after each photo session. Keep your photo files orderly and easy to access.
– Use a uniform naming system – perhaps one that identifies a bird in a photograph by their family, species, sex, age, and the activity it is engaged in (flying, perched, swimming, etc.); along with the month and year it was taken. An example of my naming system is: Raptors – Red-tailed Hawk female adult in flight 9-22.
– Keep at least 2 copies of all your photos, and keep them in different locations to ensure you never “lose” any of your valuable photos such as due to damage by fire, flood, or theft. It’s easy to keep your photos on external hard drives, separate from your computer, although it’s always convenient to have a file of favorite photographs saved on your computer too for easy access.
– When photographing birds, you will soon find there is a definite luck factor – Good Luck!
Have fun, get excited, display your favorite photos, and share your photos with others – it’s all part of the fun of photographing birds. Enjoy this ever-changing fall season as you photograph birds!
Article and photographs by Paul Konrad
Share your bird photos and birding experiences at editorstbw2@gmail.com