
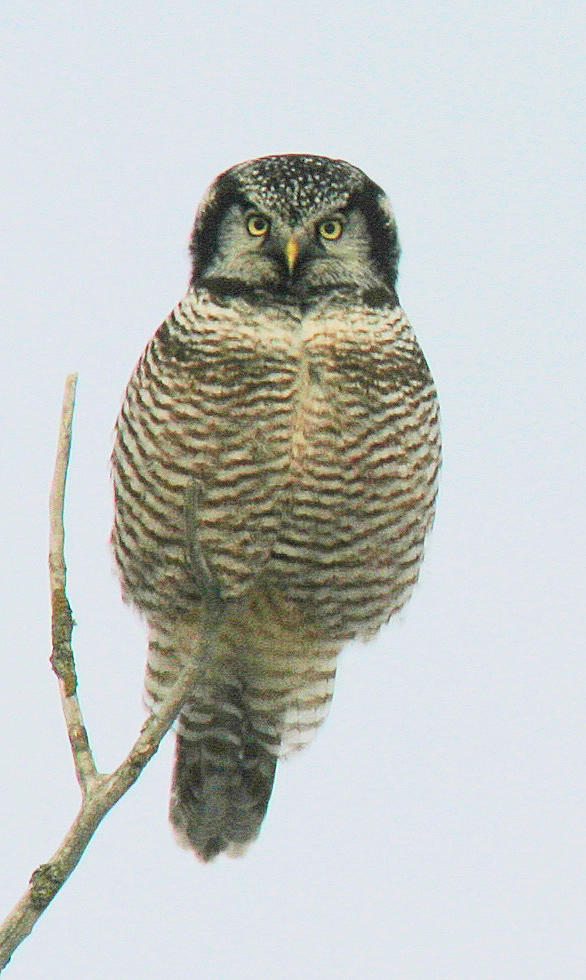
This edited Northern Hawk Owl photo shows how an image can be saved from the reject pile, using just three simple steps: 1) Cropping, 2) Brightening, and 3) Sharpening. What an improvement from the original below!

This original photograph really needed help! It was taken during an overcast afternoon and showed no promise without a little digital darkroom help.
|
Digital photography has improved in remarkable ways during the past 20 years, and so has photo editing. Some people resist any editing of photographs, and that’s fine; but a few simple editing options can help appreciably, and even salvage a photo you may otherwise deem trash. My suggestion is to keep any edits simple, keep the image as natural-looking as possible, and don’t edit unnecessarily. But if a photo needs some darkroom editing, give it a try, and improve your image with a minimum of changes.
Don’t overdo it
I see too many photos that are over-colored when edited using computer software, and too many photos that are grainy from cropping the image too closely or printing it too large. But you will learn to judge these aspects of editing photos with computer software, and you will make personal adjustments as your photo editing expertise evolves.
Protect the original – Make copies
As a rule, keep a copy of all original photos you want to edit. If you make progressive editing changes, you will want to make a copy of each image by saving them with a different name, or by simply adding a 1 or 2 to the end of the original title.
Simple is best
For now, let’s start with a few simple editing techniques, such as the four I describe below. Then, if you want to try some others, enjoy the process.
Paintshop Pro
You may already know the basics of photo editing with your preferred software, so you should be able to do similar editing using your program. I will, however, provide a simple step-by-step description of how to edit a photo using my software preference, Paintshop Pro.
This easy to use program provides two pages of photo editing options. Personally, I only use the Edit page, and I tend to use the “Crop Tool” and three editing options under the “Adjust” heading almost exclusively. Certainly, there are a multitude of other options, but I keep my photo editing simple, and thereby keep each photo as natural as possible.
1) Cropping
If a photo has extraneous background, or if you would like to increase the size of the subject in your photo, try cropping some of the image – usually the sides, top and bottom – but possibly just one side or another option.
On the Edit page, look for the “Crop Tool,” click it, and a rectangular box will appear over your photo. You can move each side of the box to eliminate portions of the image, then click the green checkmark (v) and the cropped image will appear minus the cropped area. Then you can save that image, or re-adjust and re-crop however you wish; or click the “Undo” arrow on the menu and revert back to the original image to re-crop from that starting point. It’s easy, and you will see how helpful cropping is to improve some photos.
2) Brightness and Contrast
If you have a photo that is too dark, or too light, you can improve the image appreciably during the photo editing process. In the Edit page of Paintshop Pro, click the “Adjust” button, then on the drop-down menu, click the “Brightness and Contrast” option that permits you to improve these two adjustments in tandem. Ultimately though, you will usually only adjust Brightness or Contrast individually for a given photo.
Increase the Brightness level to add light to a dark image. Increase the Contrast level to increase the color saturation in a washed-out photo. This process is simple and remarkably impressive in the ways it can improve a photo that is too light or dark.
3) Sharpness
“Sharpness” is also listed under the “Adjust” heading. This can be a helpful effect for photos that are not as sharp as you would prefer, and sometimes to help improve a photo with less than good lighting. The result of pressing the “Sharpen” or the “Sharpen more” button can be impressive. I would only use this feature if you think the photo you are editing is unsharp. Over-using the Sharpness feature may make the image grainy-looking – but sometimes it’s a balancing act between sharper and grainy.
4) One-step Photo Fix
When using Paintshop Pro, there is an interesting option called, you guessed it, “One-step Photo Fix.” By clicking this option, the first listed under the Adjust button, creates a one-step improvement of your photo. The results can be really impressive; but they can also be pretty terrible. Therefore, I find it’s worth trying it out – give it a click – and see what the software does automatically to improve your photo. If you don’t like it, reverse that effort using the “Undo” arrow and start from square one again – usually by scrolling down the Adjust button and working with the “Brightness and Contrast” option.
If the One-step Photo Fix doesn’t work for a given photo, you can sometimes learn from how the program automatically edits the image. Most specifically, Fix can show what the photo would look like if brightened, or it may show you how the photo would look if the Contrast is increased. It may also indicate that you should try to Sharpen the photo as an added edit step. Nonetheless, I like to see what the One-step Photo Fix may offer, then react accordingly.
The “Undo” arrow is your friend
On the menu of the Edit page is a pair of arrows pointing downward. The first arrow is the Undo arrow, which allows you to return to the image before your last action. The other arrow is the Redo arrow, which will take you back to where you were before you clicked the Undo arrow. The Redo arrow especially is one you will use often while editing photos.
Magnifying is really helpful
Use the + and - buttons on the menu to magnify or reduce the size of the image you are editing.
Overview
With a little practice you will quickly learn to use the four simple editing steps described above – and you will be impressed with most of the results. Give it a try if you haven’t started editing some of your photos. If you’re already a digital darkroom software user, I hope you find my simple suggestions helpful, if not for you, for a beginner.
There is plenty of information about how to use more advanced editing options from specific software manufacturers. You can teach yourself by reading instructions and trying editing options to gain experience.
Software Options
There are a lot of photo-editing software programs you can choose from; just put the subject “photo-editing software programs” into a search engine, and you will be able to check out a number of them. For me, it comes down to two software programs, and I prefer Paintshop Pro, which is economic (on sale now for less than $50), easy to use with high-quality results, and it does not require an annual subscription charge.
Adobe Photoshop has been an industry standard for many professional photographers. Photoshop provides high-quality results, but it is expensive, and now it requires an annual subscription charge. A better Adobe option may be Adobe Photoshop Elements, but I haven’t used the most recent versions of this more economic product to offer a review. For the record, Paintshop Pro was rated the Best Overall by “Top Ten Reviews” for photo-editing software priced less than $100.
For more information about photo editing software programs, you can refer to the following websites:
Corel Paintshop Pro: https://www.paintshoppro.com/en/products/paintshop-pro/
Adobe Photoshop: https://www.adobe.com/products/photoshop/
Top Ten Reviews: https://www.toptenreviews.com/software/multimedia/best-photo-editing-software/
Article and photographs by Paul Konrad
Share your birding experiences and bird photos at editorstbw2@gmail.com