
It may not appear that these three topics would be interrelated, but they are very interconnected for bird photographers. Therefore, I address them together here, rather than providing you with three different articles. We’ll keep it simple and direct with information you can use immediately – maybe during your next outing, probably for years and even decades to come. Let’s get started so you can enjoy more productive birding episodes with your camera right away.
Lighting
As noted before, lighting is everything for photography, and bird photography requires good light as much or more than other forms of photography. Sunlight illuminates your subject, it provides the brightest truest colors, it “activates” iridescent plumage, and it adds a spark of light reflected in the eye of the bird. Sunlight also provides the chance of using the fastest possible shutter speed to ensure sharp photographs, plus a corresponding aperture that enables using the broadest depth of field you wish to use.
I plan all my bird photography outings by asking the questions, “Is there sunshine?” and “Will there be sunshine?” I tend to downplay or ignore photography options under cloudy conditions. Non-photography birding is still an option under the clouds, but you’re best off waiting for good sunlight to use your camera, unless you’re happy with just getting some practice time.
Timing
Good light and timing are often interwoven, with the best light options during a given day often dictated by the time of day. The best photo time is when the sun is at a 30- to 60-degree angle above ground level. From late spring to early summer, when the sun is overhead during midday, the best times to photograph birds is during the morning and late afternoon hours. But now, through early spring, the sun is at an angle relatively low in the south throughout the day, making mid-fall through winter and early spring a prime time for photographers – as long as the sun is shining.
I am constantly watching the weather reports, planning any extended drives or birding trips for sunny days, or at least partly sunny days. It’s all part of bird photography, and it’s a very important part. But there is another aspect to timing that is important too, when you have the right light and a bird in your photo frame. Birds are quick; they are here, and then they’re not – in an instant. They are there, then they hop, run, jump, or fly to the next branch, the next flower, or the next perch. You will find that you need to anticipate such movements, and make the most of them to take action photos.
Although birds are as unpredictable as any animals, it’s always good to try to predict what will happen, and anticipate their movements in advance so you’re prepared and so you prosper from the effort. Even at your fastest, it takes a split second for you to act and react, so in the sometimes fast-paced action of bird photography you will need to try to predict birds’ potential movements.
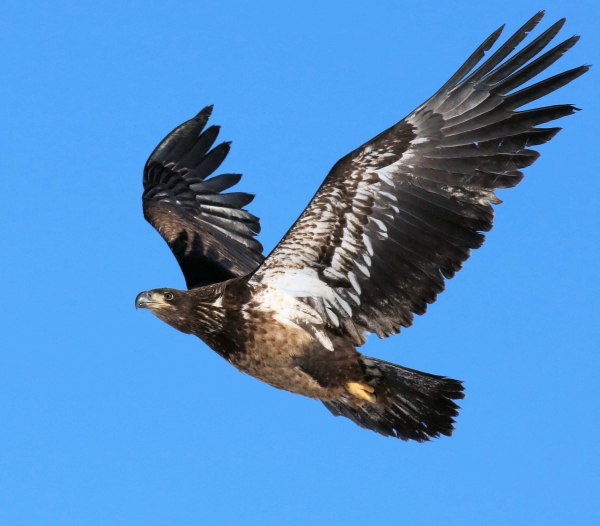
If you see an action you want to photograph, it’s probably already too late to document it. You needed to anticipate that action a moment in advance, and take the photo – or better yet, a series of photos – with the hope that your prediction and reactions pay off with a select photo or a series of two or three images. You’ll be surprised when your prediction works, but it can often times work best when a bird is in flight.
So that’s some advanced timing info, but you may not think about anticipating action as a beginner, so with this information, you’re ahead of the game – once again.
Positioning
To make the best use of good sunlight, you need to be positioned between the sun and the bird. I tend to repeat this helpful tip: As a quick reference, your shadow will point you in the right direction. That is, try to position yourself so your shadow points directly at your subject. Better yet, check your shadow as soon as you walk outside so you know the direction of the light, then plan your walk or drive so you will be in a position to edge into the best light with respect to your subject. Another way to double-check your positioning and where you need to be is to keep the sun at your back (then check for your shadow in front of you).
Positioning can also be related to your proximity to a bird. Become familiar with the range of your telephoto or zoom lens, and how close you need to be to your subject to make your photo worthwhile. In most cases you will want to fill about half of the photo frame. With that in mind, you can gauge how close you want to get in order to get the best possible photos. However, be sure to keep the birds in mind and try not to disrupt their activities by trying to get too close. With time, you will learn how birds act and react, and you will usually get an indication of when they become uncomfortable with your approach.
Positioning can also be related to your posture, so whenever possible, be sure you make a good base with your body by spreading your legs slightly and pointing your feet toward your subject. Also keep in mind that it can be effective to photograph from a lower profile – kneeling or even lying down to get closer to the bird’s level when that is possible, or when it’s effective. For instance, you may want to emphasize the bird with a perspective on it as it swims or wades or forages along a marsh or seacoast or woodland edge.
Then too, another aspect of positioning is to remember to stabilize your camera-lens combo in the best possible way – lean your lens against a stationary object (tree trunk, branch, post, building, vehicle, etc.), and hold your breath when you take a photo – you know, some of the topics of last week’s Bird Photography article.
Overview
As I write this series of Bird Photography for Beginners articles, as I’ve alluded to, I’m always trying to give you important tips and techniques that I wish I had known the first weeks of my wildlife photography efforts – even the first years. Sure, I read plenty of books, but it seemed they were focused on the technical side of the camera and lens, rather than in the field basics. Today, our digital cameras are so advanced that we can rely on their exceptional technical qualities, which permits us up to concentrate on real bird photography, the extension of birding that provides the greatest rewards and most exciting encounters with birds.
So much of what I know about photographing birds comes from experience. Eventually, your mind and body work together, sometimes instinctively, sometimes out of practice, sometimes with the advantage of experience. Above all, get out there and seek your own experiences, use some of my suggestions, learn in the process, and improve your own photo techniques and preferences. Do what works for you, and enjoy yourself and the photos you create.
Article and photographs by Paul Konrad
Share your bird photographs and birding experiences at editorstbw2@gmail.com