
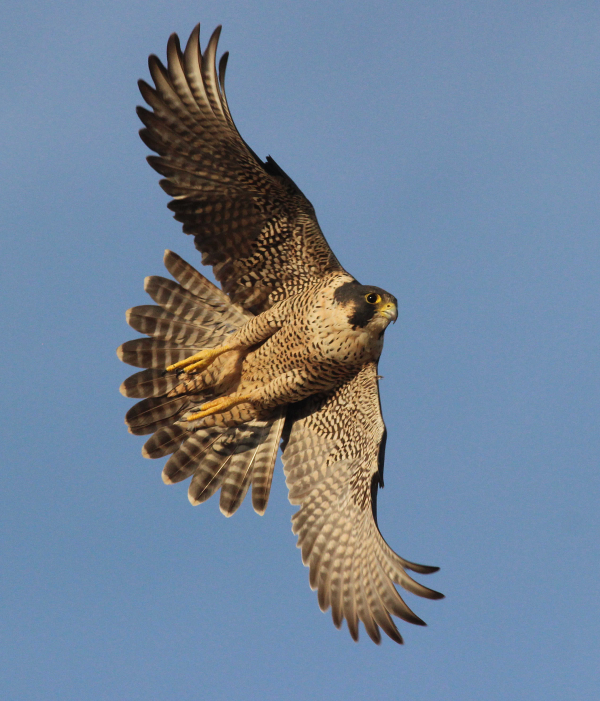
The stopped action of a downward wing stroke of a Peregrine Falcon in flight required good lighting, good positioning, timing, and a lot of luck among other elements.
|
A good bird photo records a moment of time shared between photographer and bird. It can be pretty quick, pretty simple, but it may be quite complex, depending on the photo opportunity. To make sure you’re ready for your next photo op, I developed a list of considerations that you can use as you prepare for a trip afield. You can also use these elements as you review the qualities of any photographs you take. You can also review other photographers’ work to see which photos catch your attention; then consider why you find certain bird photographs attractive. In essence, it’s all “in the eye of the beholder,” and there’s no perfect photo, but many come close.
Any good bird photograph will have a combination of elements that make it good, including:
Interesting Subjects – Any bird can be interesting, but an interesting subject can be improved by any number of additional elements, especially if you can record action, behavior, or activity. Larger birds may be easier to work with and easier to fill a photo frame with; colorful birds can catch your attention, and smaller birds can provide a unique quality to any photograph. But too often we settle for a “bird on a stick” image when with a little more patience, with continued tries, we can use action to elevate our photos.
Action – Photographs that show action are among the most impressive images; photos without a level of activity can be rather unassuming. After you take a nice portrait or two of a species, you will want more, and the same bird in action can be a big improvement over previous photos. What action? Spreading wings, stretching, interacting with another bird, flying, landing, swimming, hunting, preening, feeding, nest building, etc. Some action photos are inspiring, others are less than pleasing, but that’s part of the process. When taking photos at a fraction of a second some will be impressive, some won’t; but your editing process, your selection process, will highlight the best of your photo efforts.
Sharpness – The sharpness of a photo is the result of using a fast shutter speed, which can illustrate details of wing and tail feathers, eyes and bills, legs and feet – even when a bird’s in flight, swimming, diving, displaying. A fast shutter speed requires ample lighting, and adds to the level of detail needed to emphasize any good bird photo.
Lighting – Lighting is everything in photography – where the light comes from, how it illuminates your subject, how it creates shadows. The best angle of the sun may be at about a 30-degree level above the ground; anything more or less from about 50 to 10 degrees should be good too. Good light should illuminate a bird’s face and reflect the sun in its eyes (that shows as a small white spot in the eye); intensify colors, and provide a fast shutter speed with ample depth of field. When your shadow points at your subject, you’re in just the right position to utilize sunlight at its best.
Color – Good light from the right direction creates and reveals beautiful, cryptic, and even iridescent colors in birds, along with contrast and clarity. The background and setting are also integral to a good photo, especially when combined with an appropriate depth of field.
Setting – A bird’s surroundings, whether it’s scenery, landscape, or environment, can improve a photo by including water, trees, mountains, and more. Often, it comes down to the branch, vegetation, water, sky, or perch where a bird is positioned. Usually, uncluttered natural settings are preferred, but there are exceptions – again, the quality is “in the eye of the beholder.” Sometimes, if possible, you can improve a photo in the field by taking a step or two to one side to reposition a distracting element in the background out of the photo frame, or to the side of the photo. At times, you can position the bird to one side of your frame, perhaps in the lower portion of the frame, to show the subject as part of a larger scene. At times, a cluttered background can also detract from an image; the lack of an imposing background can improve a photo. It’s a judgement call, but it emphasizes that depth of field is an important element of this Setting topic.

Depth of Field – A bird image can be composed using a wide depth of field to show its position in its environ, in its habitat type – or you can use a narrow depth of field to throw the background out of focus and emphasize the bird against a relatively uniformly colored background to emphasize the bird itself. Both options are good, but you do need more light or a reduced shutter speed to get a wider depth of field. If you’re lucky, you may be able to try both options in the field, then decide which looks better when you’re editing your photos.
Timing – This may be relative to the moment you take a photo, or timing may be related to the time of day you choose to be in the field to utilize the best sunlight to photograph birds. Timing could also mean waiting for a sunny day to visit a favorite photo location, understanding that the best photos are taken in sunny conditions. It can also be a matter of crossing paths with a given bird – how often does luck enter into timing, even to the point of intercepting the flight path of a flying bird? Sometimes, timing is everything.
Positioning – Be sure to consider the position of the bird or birds within your photo frame. Try not to center your subject all the time; give the bird a space to one side where there is more space for it to look into, fly into, or swim into. Even if you center the bird in a photo, you can still alter the position of the bird when you crop a photo during the editing process. Also don’t overlook the option of turning your camera 90 degrees to use the vertical framing option in some photos, which can provide some interesting takes on the Setting of images.
Your Position – When photographing a bird or birds, you can sometimes improve a photo by changing your position. In some cases you can improve a photo if you get low, get down to the level of the birds you are photographing – at a wetland edge or beach, for instance.
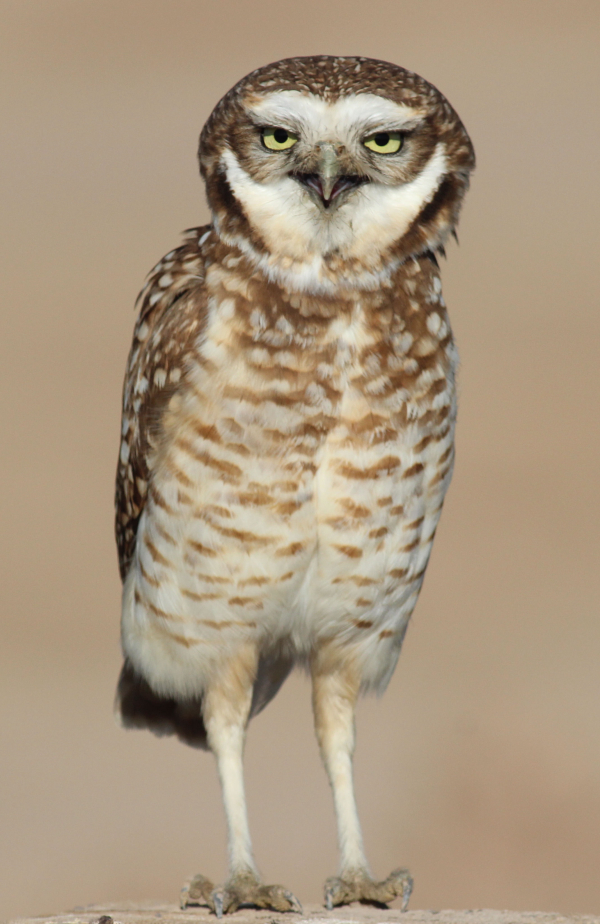
This photo of a displaying Burrowing Owl incorporates many of the things that make up a good bird photo, including an interesting subject that shows a lot of character and facial expression, action, perfect lighting, a sharp image, excellent positioning, and a neutral background among other elements.
|
Luck – There is always an element of luck when you take a given photograph. Most good photos have many lucky elements. Just finding a bird to photograph can be lucky on any given day. Timing and Luck enter into a lot of good photos.
Be Prepared – Assess the scene in advance if possible; adjust your settings with consideration for the conditions you see in mind. Similarly, pre-focus your lens, even when using auto-focus, so there is no lag time in focusing when the action starts. Be Ready for Action!
Be Versatile – Try something new, and develop your own style in the process. Taking one good photo can inspire you into a lifetime of bird photography, each good photo you take will inspire you to go birding with your camera more often; and appreciate that this is a building process toward a rewarding part of your life, making you a better birder and an inspired citizen of the natural world.
One place to review a variety of good bird photographs by many photographers worldwide can be found in National Geographic’s weekly collection of 25 Wild Bird Photographs at https://blog.nationalgeographic.org/2019/11/01/top-25-wild-bird-photographs-of-the-week-spectacular-bird-captures/
Article and photographs by Paul Konrad
Share your bird photos and birding experiences at editorstbw2@gmail.com